We have received you message
Thank You
Reply
We have received you message
Final exhibition of your work. Class discussion, critique and celebration of your new found powers to build anything you can dream of, on the web. Show your final, walk us through your code. What was the most difficult/frustrating part of the project? What was the most rewarding?
Final Assessment:
Additional materials for this unit can be found by following these links:
The goal of this unit is to:
At the end of this unit, students will have:
These are the general criteria that The Webby Awards use to evaluate web sites. You should be familiar with them.
You now know a lot more about CSS and HTML than you did when you walked in. It was difficult to first wrap your head around how this new language worked. You had to practice coding. Once you shed the obvious mistakes, coding HTML and CSS proved to be not nearly so difficult as you had first imagined. With the confidence you’ve gained you are hopefully liberated in your design sensibilities and impose it upon the code, and not the other way around. Make the code work for you.
If you’ve become really good at HTML and CSS you can give back and offer your services at the University Learning Center
Keep yourself in the loop of the continually evolving web by paying attention to what the browsers are doing, like Google Chrome Developer and Mozilla Developer.
Know that the web will be the next computing platform. HTML and CSS are to play a gargantuan role. Know it. Use it. Keep on top of it as it evolves.
Have you become interested in front end web design? Know it takes more than HTML and CSS.
Push the limits. It is amazing what a little CSS can do. Check out Diana Smith’s CSS Francine and the Explanation.
Use the web to facilitate your professional aspiration with real target audiences to make you a better and more responsive student.
Be good, enjoy what you do and have an effective web presence.
And have an interesting and rewarding life.
All the best,
onno
Forms and Peer Review. HTML forms are a standard way to collect information from the user. Activity: Create a simple form. Your final project should be a functional web site by this time. Activity: Peer Review: Students split up into pairs and review each other’s web sites.
You will be working on your final and other assignments. If you have extra time on your hands, you can build a WordPress template.
Additional materials for this unit can be found by following these links:
The goal of this unit is to:
At the end of this unit, students will have:
| 20 | Review homework and answer questions. |
| 40 | Show and Tell: Content management System — WordPress: new site |
| 15 | Student Evaluations: I will leave the room while you fill out the evaluations. |
| 10 | Break |
| 80 | In Class Help on the Final |
Sources of information that will enrich your knowledge about web design and will help you to stay current:
There are, of course, many more resources but in this ever changing fast moving web culture, you can count on these to move the web forward. This will keep you going.
As long as you are a student, your courses provide you with projects but if you are graduating, I highly recommend checking these sites out, and doing a number of projects, if not for the money, for the experience, so that you can build up your portfolio.
These are the terms that participants should be familiar with during this unit:
Forms and Peer Review. HTML forms are a standard way to collect information from the user. It requires setting up a php script. Activity: Create a simple form and include it in your final. Activity: Peer Review: Students split up into pairs and review each other’s web site(s).
1) For class: sv Create a form to collect user information for your site. 2) Write up the web site you reviewed and hand that to the person whose site you reviewed and to me. Read: chapter 16. 3) For final: Use the feedback from the peer review to finish your website. Due: The following week.
Additional materials for this unit can be found by following these links:
The goal of this unit is to:
At the end of this unit, students will have:
| 20 | Review homework and answer questions. |
| 20 | Forms |
| 20 | Implement Forms and PHP script on server. |
| 20 | How to peer review a website |
| 10 | Break |
| 20 | User test partner’s site |
| 30 | Peer review partner’s site |
| 40 | Switch Roles |
Sources of information that will enrich your knowledge about web design and will help you to stay current:
There are, of course, many more resources but Safari, Firefox and Opera are the standards compliant browsers that have carried web forward. Microsoft is also becoming a player but all of you use Macs.
LYNDA.COM is available to all Newschool students by logging in, going to the library page, clicking on databases and search for lynda.com. You will have to sign up and activate an account but this will will give you access to both the video and the supplementary exercise files.
LYNDA.COM video Series: Validating and Processing Forms with JavaScript and PHP
Validating web forms is a critical skill for any web developer, ensuring that the data that’s submitted is complete, accurate, and not malicious before it’s sent off to the server. Join author Ray Villalobos in this course as he shows how to validate input from site visitors with HTML5, JavaScript, and jQuery and then process the data with PHP. Plus, learn how to email form data and save it in a MySQL database so that it’s ready for other applications.
Links that I expect to be up and the end of the semester:
Example of landing page from a previous semester.
The final website sells something. It does not have to be lots of pages but the quality has to be ready for public scrutiny. It should have many of the topics we covered, like CSS3, Multimedia, PHP, forms media queries, etc.
These are the terms that participants should be familiar with during this unit:
Peer review is an important life skill. Do it effectively and with tact, be positive and insightful and help the person see things about their site that they did not catch, from effective design and user experience point of view to mistakes or better solutions to implementing code.
Be positive, let your partner know what you liked. Praise, comment, and correct in that order. Make positive comments about the design, its execution and overall effectiveness of the site before explaining what does not meet expectations. Look at the code to see if it is properly annotated, well organized and valid. You will run their code through validator (and css validator. I expect that the site was already valid HTM and CSS. If not, it should be by the time you are finished.
Instruct if your partner needs to understand things that you are aware of and they are not. You can help them grow in the same way that you grew this semester. Sharing is caring, and it is always good to spread the love. You really know your stuff when you can teach it!
If you are in need of an example please check out Web Standards Sherpa, a website dedicated to constructive criticism, to highlight standards compliant solution that solve real world problems. You can see articles that review the headlines of the New York Times and there are many others, including a critique of their own site.
The goal of WebStandardsSherpa.com is to provide web professionals the opportunity to receive feedback, glean advice and learn best practices from experts in the field to help improve the quality of their own work. It’s very instructive to see professional and pedagogically useful critique at work.
You do not have to incorporate your classmate’s suggestions. Trust your own judgement about your design, determine which issues are most important, though pay attention to comments if they are made by more than one peer, and get another opinion if you aren’t sure about something.
One way to get feedback is to user test your site. You will use the SilverBack application to record the user test. Download the application, which is free for 30 days.
Doing a user test is straight forward. Create a project, and create a session which will record the your peer review partner’s “user interaction” as they go through your website.
Be constructive, not just “yes” or “no”. Goint through these lists will help you dot your “i”s and crossed your “t”s, so to speak.
Using the HTML5 boilerplate should help to make your site work for most browsers. Try to test your site on Chrome, Firefox and Safari for Mac and Edge for Windows.
Help Your Partner. Everyone has learned a lot but not everyone will have learned everything equally well. You have the opportunity of helping your partner fixissues with their website where they may not have figured out the best way to do something. We are in this all together, and being able to help someone is rewarding initself.
Print out or fill in online the two pdf documents: the questions below and Adobe’s website analysis. Evaluate and answer questions. Send them to your peer review partner and CC me. If your partner has not yet finished coding their site they need to coordinate with you when it is finished, so you can do the review.
Make a list of fixes, suggestions and possible solutions to any issue that came up when assessing the website using the aforementioned considerations.
Send this report to your partner later today, if you need more time to write it up than class provides, and send a copy to me.
Forms are vital tools for collecting information from users, such as their name, email address, opinions, etc. A form will take input from the user and may store that data into a file, place an order, gather user statistics, register the person or subscribe them to a newsletter.
The form itself is created in HTML, and starts with the <form>element and ends when that element closes. All the form elements are within the form element, mostly consisting of various input elements.
The input element changes according to its attributes. If there are no attributes, it provides a one line text field:
<form>
	<input>
</form>
You add the type="text" or type="submit" attributes to the <input> tag to specify if it is text or a submit button. Add a name="name" attribute to reference the form element when it is sent. The size attribute sets the width, measured in blank spaces, and the number of characters can be limited using the maxlength="" attribute.
The submit button is created by using the input tag with a type attribute set to submit. The value="Send" attribute provides the text for the button, so the value send will label the submit button as “send”. Pressing the button engages the <form> action.
There has to be a mechanism for the form to send the information it collects. The <form> element contains a method attribute method="post" that is usually set to post. It can also be set to get, which appends the form information to the URL.
The <form> also has an action attribute action="url.php", which specifies the URL the data is sent to. In this example, it is set to use the email client with the “mailto:” command.
<form method="post" action="mailto:name@address.com">
	Name: <input type="text" size="30" maxlength="60" name="name"> <br />
	<input type="submit" value="Send">
</form>
Filling out your name and sending it will open up your email client, and create an email addressed to name@address.com. and the body of the email contains whatever name you’ve entered. This paring up of the name of the form element with the information entered needs to happen for each form element that gets sent.
Of the different types of input, the type=radio allows for only one choice out of a number of options. This is accomplished by using the same name for each of the options, so that only one can be chosen. Each option has its own value however, which is sent when that option is selected.
<input type="radio" name="color" value="red"> Red
<input type="radio" name="color" value="green"> Green
<input type="radio" name="color" value="blue"> Blue
Check boxes are similar to radio buttons but its possible to click on more than one option.
<input type="checkbox" name="color" value="cyan"> C
<input type="checkbox" name="color" value="magenta"> M
<input type="checkbox" name="color" value="yellow"> Y
<input type="checkbox" name="color" value="black"> K
Another way to present the choices is as a drop down menu, which are especially good when there are lots of options. The drop down list is created by the <select> with each choice enclosed by an option tag.
<select name="shade">
<option>white</option>
<option>light grey</option>
<option>grey</option>
<option>dark grey</option>
<option>black</option>
</select>
All of the input fields have been single lines up to this point. The textarea provides a larger area to enter text, specified in rows and columns. A row is one line of text high while column unit is a character wide. Another setting is the wrap, which can be either virtual, which wraps the words for the person entering the text, but the text is sent without returns, or, physical, where the text is sent wrapped, just as it appears in the text area. You can also turn text wrap off.
<textarea rows="5" cols="80" wrap="physical" name="comments">
Enter Comments Here:
</textarea>
If you enter text and press the send button, you can see that the words are concatenated (meaning added together) with plus signs and because the wrap is physical, the return is represented by the code: %0D%0A.
Thus far the actions for all of these examples has been the “mailto:” which sent the text to the email client. Sending an email with PHP is easy enough. All you need is the PHP mail() function:
mail("recipient@domain.com", "This is the message subject", "This is the message body");
It gets more complicated when you need to connect up and receive the information, to add security measures, verify the form entry, and so on. Most hosting services have an email script that you can use, and all you need to do is send the form to that script in the action="email-script.php" attribute.
There are a lot of PHP email scripts on the web, and Free Contact Form is one that is simple and easy to set up. It has all the parts you need. See the demo.
<?php

$email_to = "youremailaddress@yourdomain.com"; // your email address
$email_subject = "Contact Form Message"; // email subject line
$thankyou = "thankyou.htm"; // thank you page

// if you update the question on the form -
// you need to update the questions answer below
$antispam_answer = "25";
?>
You need not develop your own php file if you use Form Spree. This allows you to go beyond the options provided for in the php script.
Setting it up is easy and free. Here’s how: You don’t even have to register.
Change your form’s action attribute to the action input given below. Replace “your@email.com” with your own email.
<input type=”text” value=”http://formspree.io/your@email.com” />
Go to your website and submit the form once. This will send you an email asking to confirm your email address, so that no one can start sending you spam from random websites.
From now on, when someone submits that form, we’ll forward you the data as email.
Before HTML5, forms had to be carefully vetted with JavaScript to make sure that the information the user input was fundamentally correct, like an email address actually had the form of an email address, and a URL actually had the form of a URL. With HTML5 greatly enhanced forms support, this can be taken care of by the browser. Though there are still some browser compatibility problems, the time is coming when form checking is built right in.
Multimedia features of HTML5. HTML5 introduces a host of new features, the most visible are sound, video and the canvas element. Activity: Incorporate multimedia.
Activity: In-class final Workshop #2.
1) For class: Use audio, video or canvas to sell your final Project. 2) For final: Finish the remaining pages of your website for peer review. Read chapter 17. Due: The following week. Third Quarter Assessment: Have your Final Worksheet including all 7 steps, photoshop comp and opening page ready and uploaded.
Additional materials for this unit can be found by following these links:
The goal of this unit is to:
At the end of this unit, students will have:
| 20 | Review homework and answer questions. |
| 40 | Demo: Canvas |
| 10 | Break |
| 40 | Demo: Audio & Video |
| 40 | Final: Progress Review |
Video and canvas add a dimension of multimedia to the web experience that goes well beyond print. This should excite many of you but it can be daunting at the same time. The language of story telling on video, tools like After Effects, Final Cut Pro and Premier and the production requirements of making the videos are another world altogether.
When it is done right, video gets people’s attention, conveys emotion and personality, and engages engages people in a way that photo and text alone can’t. It can improve the website experience but it can also cripple it, suck up bandwidth, drive people away, and suck the energy out of what could otherwise be a good website by attracting too much of the attention.
Ask yourself, when you use video:
That said, Flash integrates well with video. Too bad that Apple threw it a monkey-wrench by not supporting it on its iPhone or iTablets.
The MetaProject exemplifies how flash integrates with video seamlessly working together.
You can, however, use Google’s swiffy to convert flash sites to HTML5, SVG, and javascript.
Problems of keeping video in the background like images. It takes a lot of room, requires a lot of bandwidth and careful planning, and the right video. Random Dance uses video on the splash page, and then uses it throughout the site.
Still, video can be difficult to integrate, so think about that as you work on your final. You need not integrate video or canvas in your final, just show me that you can do it in the homework.
Subscribe to the following two magazines using (RRS): A list Apart has been a beacon for web development since the web’s earliest days with timely articles, and it still remains one of the best resources out there. Smashing Magazine is another popular web design magazines that you should be reading.
There are a zillion other resources on the web, and you need to plug in to stay up to date. As this especially exciting time shows, the best is yet to come. Plug in and keep abreast of the creative solutions that become standardized practices.
Though the time it has taken each of you to understand HTML and CSS has varied, everyone should be on board by now. The more you code, the better you become.
All of you should be reaching out to the larger web community. If I have been a cheerleader that encourages you to do that, then I can feel confident that you will fish for a lifetime.
Updated links that I expect to be up and live as they will be graded for your final grade.
Example of landing page from several semesters ago.
Each assignment exhibits a skill. If you have used that skill in building your portfolio, link to that page and explain how it satisfies the homework. For example, for Week 11 CSS Animatics, if you used a hover that fades in your final, point to the page that exhibits that feature and let me know where to look if it is not completely obvious.
The final website sells something. It does not have to be lots of pages but the quality has to be ready for public scrutiny. It should have many of the topics we covered, like CSS3, Multimedia, PHP, forms, media queries, etc.
These are the terms that participants should be familiar with during this unit:
Homework for the Final
Homework for the Unit
The canvas element was originally developed by Apple for OSX as a way to encourage easy customization of dashboard widgets. It utilized Apple’s HTML rendering engine called webkit to create 2D graphics at around the same time as the WHATWG (Web Hypertext Application Technology Working Group) came together to create what would become HTML5. Apple, of course, played a central role in the creation of HTML5, and the technology was adopted by other the browser vendors.
Canvas is a drawable region that uses Javascript drawing functions to create dynamically generated graphics. This is what other drawing programs do. Illustrator draws vectors using postscript to create pictures, Canvas uses javascript. A difference is that the vectors are always rasterized at screen resolution in canvas, meaning that they are turned into a bitmap.
You first have to create the canvas element, and you do that in the body of the document:
<canvas  id="canvas" height="250" width="300">
	<p>Use a browser that supports the canvas element
</canvas>
The canvas element needs to be initialized in the Javascript, which appears between the <script type="application/javascript"> and </script> tags, and that is usually done in the head of the document:
The actual instructions are written right after the canvas element has been initialized. The following examples show the instructions that draw a square and a circle.
You draw on the canvas by coding the exacting steps the computer requires to draw these shapes. There is only one shape it supports natively, and that is a square. All other shapes have to be drawn path by path. Luckily, there are drawing functions that make it possible to create complex shapes.
If we take a red square as an example, you first specify the fill style and then fill the rectangle based on the given coordinates. Click the draw button and you will see this red square appear in the canvas window. If you change the values, the square will change.
var canvas=document.getElementById('theCanvas');
var context=canvas.getContext('2d');

//code for the square
context.fillStyle = "rgb(255,0,0)";
context.fillRect(50, 50, 50, 50);
Paths require a few more steps. You have open and close a path using the following code: beginPath() , and closePath(), though the shape automatically closes when you stroke() or fill() the path. In that case, the closing of the path can be skipped. There are path methods that draw lines, arcs, bezier and quadratic curves.
The following circle has all of its steps annotated, so show exactly how many steps it takes to create a red circle with a white fill that has a shadow, the letter P and a stroke to create a no parking sign. Copy the code and replace the code for the square in the Javascript Code View, click Draw It if you haven’t already done so, and you can play with the code, add to it, subtract, to see how it works. If you get excited, I have included many more definitions below that you can use to draw simple shapes.
context.beginPath(); //Begin drawing path
context.strokeStyle="#f00"; // sets stroke color
context.fillStyle="#fff"; //sets fill color
context.arc(175,120,100,0,Math.PI*2, true); // draws circle
context.lineWidth=40; // sets width of stroke
context.shadowOffsetX="3" // adds shadow offset x
context.shadowOffsetY="3" // adds shadow offset y
context.shadowBlur="7" // adds shadow blur
context.shadowColor="#888"// sets shadow color
context.stroke(); // draws stroked circle

//remove shadow from inside of circle
context.shadowOffsetX="0" // removes offset x
context.shadowOffsetY="0" // removes offset y
context.shadowBlur="0" // removes blur
context.fill(); // draws fill
context.closePath; // closes path

context.beginPath();  // draws P
context.lineWidth=15; // width of line
context.strokeStyle="#000"; // color of stroke
context.fillStyle="#000"; // color of fill
context.font="9em sans-serif"; // size of font
context.strokeText("P",120,190); // text stroke
context.fillText("P",120,190); // text fill
context.closePath; //  but closes path

context.beginPath();   // draws Slash
context.strokeStyle="#f00"; // sets stroke color
context.moveTo(100,50); // begin vector
context.lineTo(240,210); // end vector
context.lineWidth=25; // width of line
context.stroke(); // draw stroke
context.closePath; // not necessary but closes path
You can copy these definitions and paste them into the editor to create a shape. Check out the example shapes to see what definitions are required.
Styles
set the fillStyle

context.fillStyle="color"

set the strokeStyle

context.strokeStyle="color"

line widths

context.lineWidth=number

line join styles

context.lineJoin="style" (bevel, round, miter)

line end styles

context.lineCap="style" (butt, round, square)
Rectangles

draw a rectangle

context.strokeRect(left, top, width, height)

fill a rectangle

context.fillRect(left, top, width, height)

erase a rectangle

context.clearRect(left, top, width, height)
paths

begin a path

context.beginPath

complete a path

context.closePath

move the pen to a location

context.moveTo(horizontal, vertical)

draw a straight line from current pen location to a new location

context.lineTo(horizontal, vertical)

stroke the current path

context.Stroke()

fill the current path

context.fill()
Text

set the font

context.font="bold italic size font-family"

set the alignment

context.textAlign="left right center"

fill some text

context.fillText("string to fill", top, left)

stroke some text

context.strokeText("string to stroke", top, left)
Shadows

shadow color

context.shadowColor="color"

shadow horizontal offset

context.shadowOffsetX=number

shadow vertical offset

context.shadowOffsetY=number

shadow blur

context.shadowBlur=number

taken from Westciv
More code examples to paste into the Javascript Code View.
context.beginPath();
context.arc(75,75,50,0,Math.PI*2,true); // Outer circle
context.moveTo(110,75);
context.arc(75,75,35,0,Math.PI,false);  // Mouth (clockwise)
context.moveTo(65,65);
context.arc(60,65,5,0,Math.PI*2,true);  // Left eye
context.moveTo(95,65);
context.arc(90,65,5,0,Math.PI*2,true);  // Right eye
context.stroke();
context.beginPath();   // Triangle
context.strokeStyle="#000";
context.fillStyle="#ff0";
context.moveTo(70,20);
context.lineTo(137,120);
context.lineTo(3,120);
context.lineTo(70,20);
context.lineWidth=3;
context.stroke();
context.fill();
context.closePath;

context.beginPath();   // !
context.fillStyle="#000";
context.font="5em sans-serif";
context.fillText("!", 58,108);
context.closePath;
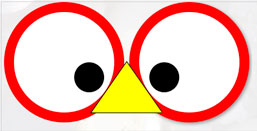
See if you can draw this figure using the shapes similar to the ones already drawn in the demo, or draw your own shapes. You can copy and paste the definitions, just make sure you initiate the object, give it properties, draw it and then create it, and if this seems laborious, be glad you are not a computer, who does nothing but this type of routines.
Better yet, watch someone else create a canvas based on processing, a sister visual programing language developed to teach visually oriented people programming, right before your eyes, using popcorn.
Drawing these primitive shapes by hand is really only for the purpose of understanding how canvas works. In its raw form it will never be a drawing tool for design students.
But that can change if someone were to write drawing software that could be translated to the canvas element. This is exactly what Mike Swanson has done. He created an Adobe Illustrator to HTML5 Canvas plugin. [Unfortunately, the plugin has not been updated, and it did not load the last time I tried it with Illustrator CC. Still, this is a good learning opportunity for you to understand how canvas works, and it is better to use SVG Graphics and insert the vector art straight into the code.]
This is an Illustrator plug-in that transforms Illustrator art into canvas art, allowing you use Illustrator as a front end to draw with, and the plugin will render it into Javascript code equivalent that can be rendered in the canvas element. Check out the Yellowstone Map as an example, and if you go to the website, you will see that the plugin is able to create motion graphics as well. We do not have the ability to install Illustrator plug-ins in the school’s computers but please try this on your computer, as Illustrator is a very good front end to drawing directly on the canvas. If you follow his tutorial, you can even animate!
So here is an example of Illustrator art I created turned into Javascript. It takes only 5700 lines of code! To put that into perspective, the Illustrator file requires about the same number of lines using postscript to create the picture. Here is a text version of the Illustrator file, and the html source so you can see that there are an equal number of instructions.
Advanced examples using the canvas element from the web:
Canvas is made for creating games. It turns graphic assets into bitmaps ready for use. If you already know some JavaScript, and would like to explore making games, then the next links are for you.
Step by step explanation of how to create your own game using javascript and canvas.