All that is needed to code for the web is a text editor. Everything we do is coded by hand. For learning how to code, it is best to write the code itself with a simple Text Editor so that the repetition helps you to remember. Once you know what you are doing, you can use amore advanced editors. No authoring programs like Adobe Dreamweaver or Muse.
It’s our preference to use a text editor, like HomeSite, TextPad or TextMate, to “hand code” everything, rather than to use a wysiwyg what you see is what you get HTML and CSS authoring program, like Dreamweaver. We just find it yields better and faster results.
Khoi Vinh, Design Director at NYTimes.com from NY Times Article
Text Editor
The text editor, the browser and FTP program are all you need to build web sites. Do not use Microsoft Word or another word processor. There are many text editors. I prefer a simple HTML/CSS dedicated editor with live preview. Brackets is the most straightforward, simplest, and easiest editor with a built in preview. You can also use the Phoenix in browser editor (currently only works with the Chromium based browsers). Atom and BBEdit are other HTML centric editors.
Other editors are for general programming, and target all kinds of programming languages. They are good but can be more confusing to use, like Microsoft’s Visual Studio and SublimeText.
The Browser
Any of the standards compliant browsers can be used. Chrome is most popular, Firefox is the best, and Safari plays nicest with the OSX operating system. Every other browser runs on the Chrome engine. In Safari, go into the Preferences -> Advanced tab and select Show Develop Menu in the menu bar to get the development goodies to show. All browsers allow you to inspect the code with the browser development tools. Right click, select Inspect, to zoom into the code that describes the document at the point where you click. If you have never done that before, please explore the code behind the websites you browse.
HTTP
Hypertext Transfer Protocol (HTTP) is a protocol for transmitting hypermedia documents, such as HTML. It was designed for communication between web browsers and web servers, but can be used for other purposes. HTTP follows a classical client-server model, with a client opening a connection to make a request, then waiting until it receives a response.
SFTP using Fetch or FileZilla
Uploading your files to the server requires a Secure File Transport Protocol (SFTP). The application that does that for Mac users is Fetch. With it you can upload and download files onto your web space at school. Fetch was created at a university and is free to all students. You can get your free license here. Fill out the form, use the Parsons mailing address 66 5th Avenue, New York 10011, and they will send you a serial number to use with Fetch.
FileZilla is a cross platform SFTP program for students using windows. Instructions for connecting and transferring files using Fetch and FileZilla are available near the bottom of the page.
Other SFTP programs available on both the Mac and Windows operating systems are CyberDuck, WinSCP, Fugu, and Transmit.
Publishing Your Work using Fetch
Everyone will publish their work on the web. We start by making sure that everyone can. The software most of you will use is Fetch. Don’t forget to register the product. It is free to all students.
The server space is a lot like your desktop, only instead of folders, like on OSX, they are called directories. These servers are usually run by computers running Unix or Linux. These operating systems do not tolerate spaces. Lower case letters and capitalized letters (a and A) are not the same. Follow those rules to minimize problems uploading files to the web.
You can drag and drop between the Finder window and Fetch. When you drag the same document into Fetch, the existing document will be overwritten without warning. This is default behavior. Always keep your latest version on your hard disk, where it can be backed up, rather than online, where you can accidentally over-write it.
If you need more help, visit the Fetch help pages
Setting Up Your Domain
The domain is the name that you type in to get to the website. All websites are known by their number, but to make it easier for humans, they allow us to connect a domain name to that number. You can get you own, or by default, you will use the Parsons.edu domain.
Everyone has server space at Parsons. The domain is hosted on the Parsons B Server. It looks like http://b.parsons.edu/~dejongo/. I have already created a page that has a link to the parsons folder I want you to set up. You can mask a domain name to that space. Alternatively, you purchase your own server space, you will need to register a domain name. Cost is approximately $15 a year for the domain name and renting server space ranges from $12 to $120 a year. Many hosting services include the cost of the domain name with the hosting plan.
Setting Up Your Server Space at Parsons
Art, Media, and Technology B.PARSONS.EDU user accounts are set up when I send a list of student names to the IT Department. They use the standard New School identification: last name with first initial and numbers that you are familiar with, prefaced by http://b.parsons.edu as your user account.
You will be sent an email once the IT department has created your account. The email is from: root
This email may have entered your spam folder, which can make it difficult to find. Please find the email and follow the instructions to set up your server space.
The email will contain your B Server address, user, and password. You need to have your b.parsons.edu address and your B Server password to access your server space.
If you have questions, or if it does not work, you should check to make sure address, name and password are typed in correctly. If it still does not work, enter a service request. Click on the link to Submit an IT Service Request at the top right of the page. Please have tickets assigned to Enterprise Systems group. Include your Last Name, First Name, Net ID, email and a request to ask about your server space on the b.parsons.edu server. You can also email the IT department to create a ticket.
Getting your Own Host and Domain Name
A lot of hosts give you a free domain if you subscribe. I personally use DreamHost, as they host non profit sites I work on for free. Their price is more expensive.
One host I’ve run across is Ebound hosting, which has a great intro plan that costs only $1 a month. They also have an unlimited plan that gives you everything for under $5 a month including domain name for the year, multiple domains and all the usual goodies in spades. Their help response was quick and resolved all problems the one time I had to use them. Give them a try.
Their cost, with a three year plan, is $4 a month, and that includes a lot of goodies, including a domain free for the first year. Search the web for a discount. There is a 25% discount using this code: EBH25 at the time I write this. I have no connection with Ebound hosting but in calling them to solve a problem, a real human answered on the second ring. That’s amazing these days.
Finally, to get you started, you can host for free at biz.nf but their plans are more expensive over the long run than what you get with Ebound hosting. I’ve kept a number of domains for over 20 years, so the costs add up.
Purchasing a Domain Name
Registrars like name.com or Moniker, both of which I’ve used. there are a lot of accredited registrars
You cannot point a domain to your New School or Parsons server space but you will be able to mask your domain to these accounts. That means a frame is created with your domain name above the address bar but it actually shows the school website, which appears in that frame.
Connecting and Uploading Files to your Server Space
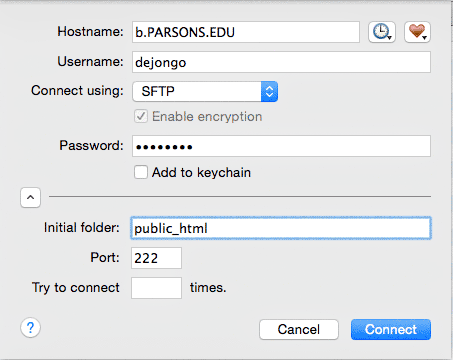
To access your files using Fetch, fill out the Hostname with “b.parsons.edu” then fill out Username with your Newschool ID, set your connection to SFTP. Fill in your password. It can be found on the email from root. Set the port to “222” and your initial folder to “public_html”. You should be able to log on.
On Windows using FileZilla or on Macs that have trouble connecting to the server using Fetch from school or home, enter sftp://b.parsons.edu for Host, your username with your New School ID, the password as found on the email from root, and port: 222. That should work. In the left hand pane locate directories on your hard disk which contain the files to be transferred, and transfer them to the right pane representing your server space.
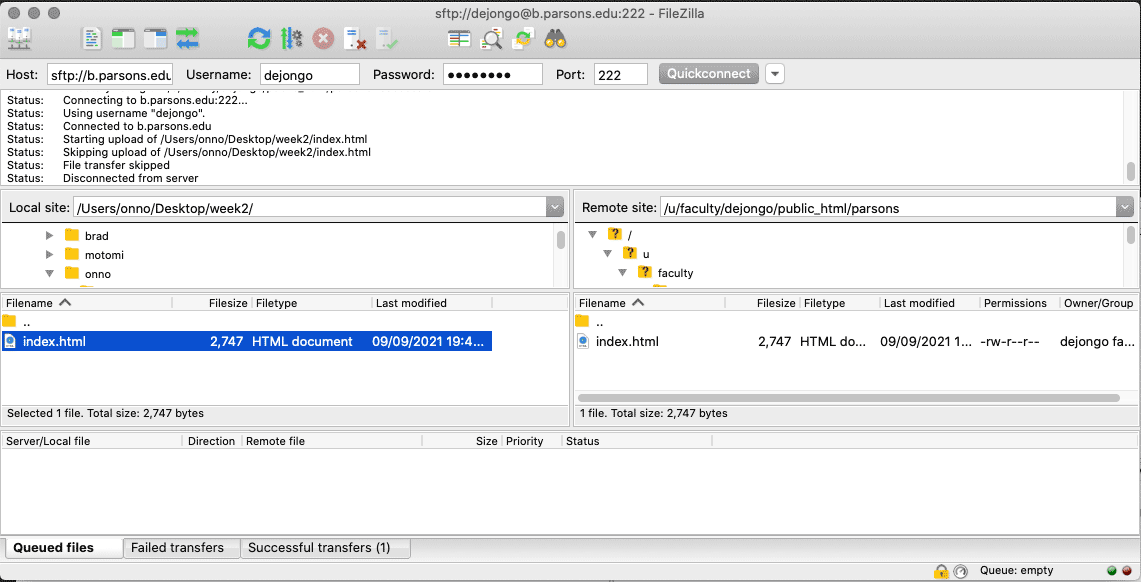
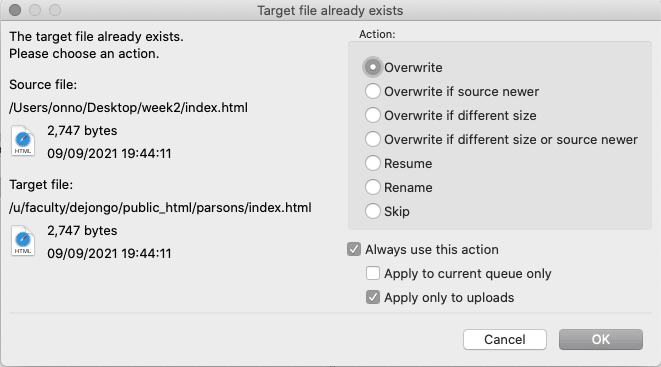
You will be asked to confirm overwriting the file, which is the standard option. Check “Always us this action” and “Only apply to uploads”.
The server is laid out much like your hard disk. You will drag files from the finder into Fetch, as if it were a local window. The main difference is that Fetch will not warn you when you are overwriting your files. This is a good thing, as you will be dragging your files from your desktop to the server and overwritten the old files with new files the whole semester long.
The second difference is that upper and lower case letters are completely different, and have nothing to do with one another. On your hard disk, it makes no difference. On the server, your links will not work. My suggestion is to name all files using lower case. Do not use spaces in file names!
On the parsons B Server, you need to place all your files in the public_html folder. Different hosts can designate different names for this folder.
Setting up your Server Space
I expect you to use your root — public — directory for your own purposes. The class works out of a folder called “parsons” with a lower case p. Case matters! Create a new folder and call it parsons lowercase p in the root directory. That is where you will develop all of your work for this class. As there is a midterm with associated assignments and a final, create two folders a portfolio and a final folder.
Web Site Organization

Index.html and Worksheet.
You will create an index.html page inside of the parsons folder done in-class during the second week that will contain the links to each of your assignments, a photograph of yourself, along with your name and your major and minor, if you have one, so I can associate your work with you as a person.
Your first assignment example counts as research for your portfolio. It could go in the portfolio folder or stand alone. A work-file inside of the portfolio example and final assignment folders example will serve as your worksheet. This is where you document your creative development in at least seven steps. Update these work-files with all of the work you do to get to your final. This includes old ideas even when you change your mind and start working anew. That way I can assign credit where credit is due.
The landing page for each student needs to work exactly the same. This is how I make contact with your work. I will be going to this page to check up on your progress, so keep it current. Your grade depends upon it. Homework needs to be up the day before class — so I have some time to check it before teaching, for issues that can then be addressed in class.