01 OpenAI Text/DALL·E

DALL·E 2023-01-26 06.04.23 - oil painting in the style of Van Gogh of product design students at parsons having a wild and crazy time in New York City
Prompt: oil painting in the style of Van Gogh of product design students at parsons having a wild and crazy time in New York City

OpenAI Chat: Website for Product Design Student

Image and chat response created by artificial intelligence

Me:

Can you turn the following into a website? I am a student product designer looking for work?

ChatGPT:

Yes, I can help you create a website to showcase your work as a student product designer. However, as a language model, I do not have the capability to create a website directly. I can provide you with the information and guidance you need to create a website, such as tips on design, layout, and content. You will need to use a website builder or hire a web developer to create the website for you.

Me:

How do I start?

ChatGPT:

To start creating a website, you will need to decide on a few key things:

  1. Purpose: What is the main goal of your website? Is it to showcase your portfolio, promote your services, or provide information about your work?
  2. Domain and hosting: You will need to purchase a domain name (e.g. www.yourdomain.com) and find a hosting provider to host your website.
  3. Platform: There are several different website builders and platforms available, such as WordPress, Wix, and Squarespace. You will need to choose one that best fits your needs and skills.
  4. Design and layout: Think about the overall design and layout of your website, including colors, fonts, and images. You should also consider how to organize your content in a way that is easy to navigate.
  5. Content: Create the content for your website, including text, images, and videos that showcase your work.

Once you have decided on these things, you can start building your website. You can also hire a web developer to help you with the process.

Also, you can showcase your work using online portfolio platforms like Behance, Dribbble, etc which will make the process easier for you.

Me:

how important are websites for job recruitment?

ChatGPT:

Websites can be an important tool for job recruitment, both for job seekers and employers.

For job seekers, a website can be a great way to showcase their skills, qualifications, and work experience. It can also be an easy way for potential employers to find job candidates and get a sense of their qualifications and experience.

For employers, a website can be a powerful recruitment tool as it allows them to reach a wide audience of potential job candidates and to provide detailed information about job requirements, company culture, and benefits. Additionally, many companies use their website as a way to post job listings and accept online job applications.

Having a website can also give a sense of credibility to the job seeker and employer, as well as it can be a way to share more than what a resume can show, like online portfolio, videos, projects, etc.

Overall, a website can be a valuable tool for both job seekers and employers in the recruitment process.

Me:

In product design, what do employers look for in a website

ChatGPT:

In product design, employers typically look for a few key things when reviewing a candidate’s website:

  1. A clear and well-designed portfolio: Employers want to see a clear and well-organized portfolio that showcases the candidate’s best work. This should include detailed images, descriptions, and any relevant information about the design process.
  2. A strong online presence: Employers want to see that the candidate has a strong online presence, including a professional website, social media profiles, and an active blog. This shows that the candidate is up-to-date with the latest industry trends and technologies.
  3. A clear understanding of the design process: Employers want to see that the candidate has a clear understanding of the design process, including research, concept development, prototyping, and user testing. This can be demonstrated through case studies, design diaries, or other documentation of the design process.
  4. Relevant skills and experience: Employers want to see that the candidate has the relevant skills and experience to do the job. This should be highlighted in the portfolio and on the website, and should include information about the candidate’s education, work experience, and any relevant certifications.
  5. Strong communication and presentation skills: Employers want to see that the candidate can effectively communicate and present their ideas, and this can be demonstrated through the website’s writing, videos, and images.
  6. Strong attention to details: Employers want to see that the candidate has strong attention to details, this can be seen in the design of the website, the way the portfolio is presented, the way the information is organized, etc.

Overall, employers want to see a website that is professional, well-designed, and effectively communicates the candidate’s skills, qualifications, and experience.

Me:

If I only have two years of school work to show, what is the best work to show my skillset and problem solving abilities.

ChatGPT:

If you only have two years of school work to show, it’s important to choose the projects that best demonstrate your skillset and problem-solving abilities. Consider the following when selecting projects to showcase:

  1. Complexity: Choose projects that demonstrate your ability to tackle complex problems and design solutions. These should be projects that required you to use a variety of design techniques, tools, and methodologies.
  2. Originality: Choose projects that demonstrate your ability to come up with original ideas and designs. This could be projects where you had to solve a unique problem or create something that hasn’t been done before.
  3. Design process: Choose projects that demonstrate your ability to follow a design process, including research, concept development, prototyping, and user testing. Provide information about your research, the design process, and the results.
  4. Relevance: Choose projects that are relevant to the type of product design you want to work in. If you want to work in industrial design, for example, choose projects that demonstrate your ability to design physical products.
  5. Problem solving: Choose projects where you had to demonstrate problem-solving skills. This could be projects where you had to find innovative solutions to difficult challenges.
  6. Show the outcome: Choose projects that have clear outcomes, and demonstrate the impact of your design, for example, a product that was manufactured, a service that was launched, etc.

It’s also important to have a clear and well-organized portfolio, with detailed images, descriptions, and any relevant information about the design process, and a clear way of navigation. It’s also helpful if you can provide examples of how your designs have been received by users or customers.

Me:

How important is it for my website to stand out and be memorable? What can I do to make it that way?

ChatGPT:

It is important for your website to stand out and be memorable because it is often the first point of contact potential employers will have with you. A well-designed and memorable website can help you make a strong first impression and increase your chances of getting hired.

Here are a few things you can do to make your website stand out and be memorable:

  1. Be unique: Showcase your personal style, point of view, and personality on your website. This will help you stand out from other candidates and make a lasting impression on potential employers.
  2. Make it visually appealing: Use a clean, modern, and visually appealing design. Use high-quality images, typography, and layout to make your website look polished and professional.
  3. Make it easy to navigate: Make it easy for potential employers to find what they’re looking for on your website. Use clear and consistent navigation, and make sure your portfolio is easy to find.
  4. Show your process: Employers are interested in seeing the design process, not only the final product. Share your design process, research, sketches, and iterations, this will make your portfolio more interesting and unique.
  5. Show your impact: Highlight the impact of your designs, for example, if a product you designed was manufactured, or if a service you designed was launched, etc.
  6. Show your skills: Make sure your website showcases your skills and qualifications, and highlight any relevant work experience or education.
  7. Use multimedia: Use videos, images, and animations to make your website more engaging and interactive.
  8. Make sure your website is mobile-friendly, as many people use their mobile devices to browse the web.

Overall, a memorable website should be visually appealing, easy to navigate, and effectively communicate your skills, qualifications, and experience. It should showcase your unique style, personality and process, as well as the impact of your designs, and be mobile-friendly.
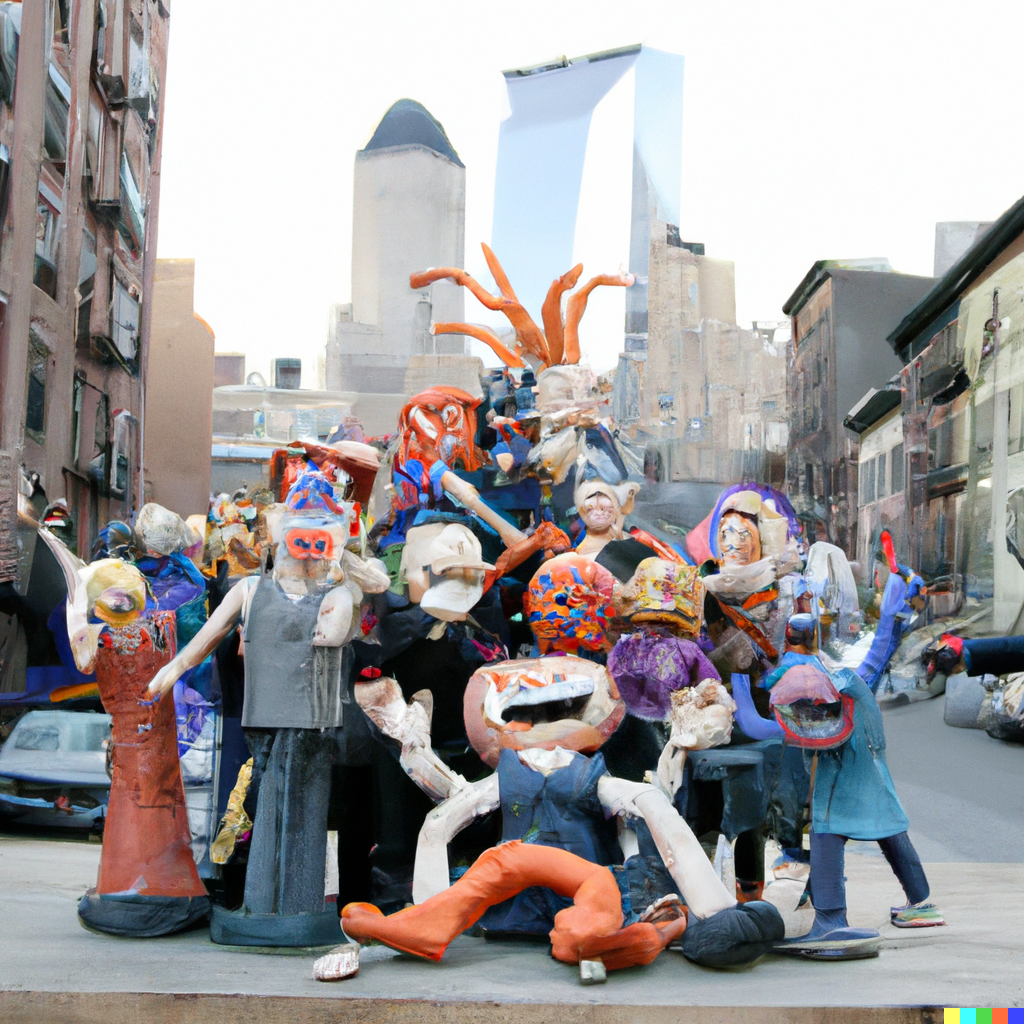
DALL·E claymation  sculptures of product design students at parsons having a wild and crazy time in New York City
Prompt: claymation sculptures of product design students at parsons having a wild and crazy time in New York City

Me:

Will a more generic templated design suffice or does that make it look like what too many other people in my field offer?

ChatGPT:

Using a more generic templated design for your website may make it look similar to other websites in your field, which can make it less memorable and less effective in standing out to potential employers. While it’s understandable to use templates to save time and effort, it’s important to remember that a template often used by others may not be able to reflect your unique style, personality, and design process.

Using a pre-made template can make it harder to showcase your individuality and skillset. It’s also less likely to reflect your design process, design thinking, and problem-solving abilities, which are important for product design.

That being said, it’s not impossible to make a templated website stand out. You can customize it by changing the colors, typography, images and layout, to reflect your style and personality, and by adding multimedia elements, like videos and animations. Additionally, you can make sure that the navigation and the portfolio are easy to find and well-organized.

It’s also important to remember that the content of your website, like the portfolio, case studies, and writing, is the most important aspect. Even if the template is generic, if the content is well-presented, engaging, and effectively communicates your skills, qualifications, and experience, it can still make a strong impression on potential employers.

In summary, while a generic templated design may save time and effort, it can make it harder to stand out and make a memorable impression. Customizing the template and making sure the content effectively communicates your skills, qualifications, and experience is important to make it stand out.

Me:

So you think it is best to hand code websites for maximum creative impact and originality, and to show my problem solving skills.

ChatGPT:

Hand coding a website can have a greater creative impact and originality than using a pre-made template, as it allows you to create a unique and personalized design that truly reflects your style, personality, and problem-solving abilities. It also allows you to have more control over the website’s layout, functionality, and overall user experience.

By hand coding a website, you can create a design that is tailored to your specific needs, and that showcases your problem-solving skills. You can also take into account the latest web design trends and technologies, and ensure that your website is fully responsive and optimized for different devices and screen sizes.

That being said, hand coding a website does require a certain level of technical skill and knowledge, as well as time and effort to develop. It’s important to consider your own skills and resources before deciding to hand code a website. Additionally, it’s not only the website design that makes the difference, but also the content. An effective website should have a clear message, easy to understand and well-organized, and should showcase your skills, qualifications and experience.

Overall, hand coding a website can have a greater creative impact and originality, and can showcase your problem-solving skills. However, it also requires a certain level of technical skill, and time and effort to develop. It’s important to consider your own skills and resources, and also focus on creating a clear, well-organized and effective website content.

Me:

What are the current trends in product design?

ChatGPT:

Here are a few current trends in product design:

  1. Sustainable design: There is an increasing focus on designing products that are environmentally friendly and sustainable. This includes using sustainable materials, designing for disassembly and recycling, and reducing energy consumption.
  2. Human-centered design: Product designers are increasingly using human-centered design methods to create products that are tailored to the needs, wants, and preferences of users. This includes user research, prototyping, and testing to ensure that products are easy to use and meet the needs of their intended users.
  3. Technology integration: Product designers are incorporating new technologies, such as IoT, AI, and AR/VR, into products to enhance their functionality and user experience. This is particularly relevant in areas such as smart home, wearables, and transportation.
  4. Accessibility: There is a growing awareness of the importance of designing products that are accessible to people with disabilities. This includes designing products that are easy to use for people with physical, visual, auditory, or cognitive impairments.
  5. Minimalism: The minimalistic design trend is still popular in product design, characterized by simple and clean lines, and a focus on the essential elements of a product. This helps to create a sense of elegance, simplicity and timelessness.
  6. Personalization: Product designers are increasingly creating products that can be customized to the individual preferences of users. This includes using 3D printing and other technologies to create personalized products.
  7. Virtual and Augmented Reality: These technologies are increasingly used in product design to create immersive experiences, virtual prototypes and simulations, as well as to enable remote collaboration and remote product testing.
  8. Material Innovation: Product designers

Me:

What is the best advice you can give a product design student?

ChatGPT:

Here is some advice for a product design student:

  1. Develop a strong design process: Having a clear and well-defined design process is essential for effective problem-solving and creating successful designs. This includes understanding the problem, researching and gathering information, generating ideas, prototyping and testing, and iterating on your designs.
  2. Learn from other designers: Study the work of other designers, both past and present, to understand different design styles and approaches, and to gain inspiration for your own work.
  3. Be open to feedback: Always be willing to receive feedback on your work and to use it to improve your designs. Feedback can come from your professors, peers, and professionals in the industry.
  4. Stay informed: Stay up-to-date with the latest trends, technologies, and materials in the field of product design. This will help you to create designs that are innovative and relevant.
  5. Don’t be afraid to experiment: Experimentation and exploration are key to developing your own unique style and voice as a designer. Don’t be afraid to try new things and take risks.
  6. Network and collaborate: Network with other designers and professionals in the industry, and seek out opportunities to collaborate with them on projects. This will help you to gain valuable experience and to make connections that can be beneficial for your future career.
  7. Show your work: Document and share your work through a portfolio or website, this will help you to showcase your skills and qualifications to potential employers.
  8. Keep learning: Remember that learning never stops, continue to seek out opportunities for

Me:

I will be competing for jobs with many other like minded and like skilled students, what are the best ways to stand out?

ChatGPT:

Here are some ways to stand out as a product design student competing for jobs:

  1. Develop a strong portfolio: A well-crafted portfolio is essential for showcasing your skills and qualifications to potential employers. Make sure that your portfolio is well-organized, visually appealing, and that it effectively communicates the design process and thought behind your work.
  2. Build a personal brand: Develop a personal brand that reflects your unique style and personality. This can include a personal website, social media presence, and a consistent design aesthetic.
  3. Specialize in a specific area: Consider specializing in a specific area of product design, such as a certain industry or type of product. This will allow you to become an expert in that area and to differentiate yourself from other designers.
  4. Showcase your problem-solving skills: Emphasize your problem-solving skills in your portfolio and during interviews. Highlight how you approached and solved complex design problems, and how you used research, prototyping, and testing to arrive at your final design.
  5. Showcase your experience: If you have any relevant experience, such as internships or freelance work, make sure to include it in your portfolio and highlight it during interviews. This will demonstrate to potential employers that you have real-world experience and that you are capable of working on projects from start to finish.
  6. Be proactive and take initiative: Don’t wait for opportunities to come to you, actively seek out opportunities for internships, collaborations, or freelance work. This will give you valuable experience and help you to build a network of contacts in the industry.
  7. Be adaptable and flexible: Be open to new ideas and be willing to learn new skills and technologies. This will help you to stay current and relevant in the industry.
DALL·E oil painting in the style of Van Gogh of product design students at parsons having a wild and crazy time in New York City
Prompt: oil painting in the style of Van Gogh of product design students at parsons having a wild and crazy time in New York City

Me:

Thank you for your advice

ChatGPT:

You’re welcome! I hope my advice will be helpful for you as you continue to pursue a career in product design. Remember that success in the field of product design often comes down to hard work, persistence, and a willingness to learn and adapt. Keep honing your skills, showcasing your work, and networking with others in the industry. Good luck!
01 HTML5 Template Playground

The HTML and CSS PlayGround is live version of the HTML Template that contains the tags inside the tag of the HTML5 Template. Right-click (control-click)* on the code and choose Open Frame in New Window. Play and experiment until you understand the relation between the HTML content and CSS form.

* Chrome based browsers require the Open Frame extension.

01 Design Fundamentals

All communication is in need of design. While Parsons teaches the visual literacy required for your area of concentration, communication and web design share fundamentals that make for a good product.

Empathize

THE HEART OF DESIGN

Designers work to solve others’ problems but the most insightful and innovative design work begins with empathy. Slip on your users’ shoes and seek to gain understanding with an open mind. You’ll be surprised what deep needs and insights you can uncover.

Define

REFRAME THE PROBLEM

A single image of the earth from the moon shifted the course of environmental history. A new point of view on a design problem can shift your perspective just as much. Learning to reframe your point of view based on insights from your users can be a powerful design tool.

Ideate

BEYOND BASIC BRAINSTORMS

Ideation early in the design process helps teams get aligned and find potential solutions to investigate. While most teams use some form of ideation, design thinking can lend new structure and spark the brainstorming process.

Prototype

GET SMARTER, FASTER

The smartest design teams build prototypes throughout the design process. Rather than discover issues after the expense and time spent on building a complete product, challenge assumptions and solve disagreements through iterative prototyping.

Test

EARLY AND OFTEN

Prototyping forms a key step in solid product design, but the best design teams go a step further and test their products with real users. Observing how your end user approaches your product gives you the most important feedback of all.

15 Final Grade Calculation

Final Grade Calculation

The final grade adds up to a possible 110%, allowing some leeway in the satisfactory completion of all assignments, as long as the student attends and participates in class. 3 Absences are ground for Failure.

* Does not require coding. No Late Assignments accepted.

Send me a zipped version of your final project before the due day, 5 days after the last class.

Grade calculation:

Date Due Percent
2/6/15 Website Analysis* 5%
2/13/15 Landing Page 5%
2/13/15 HTML markup of Analysis 5%
2/20/15 7 Steps — Midterm Worksheet* 5%
2/27/15 CSS selections 5%
2/27/15 Photoshop comp/ HTML Wire Frame 5%
First Quarter Assessment
2/27/15 incorporate CSS Layout Strategies in web site 5%
2/27/15 Quiz:
3/6/15 Peer Review 5%
Official Midterm Review
3/13/15 Typography Poster 5%
3/13/15 Portfolio: Midterm 10%
3/13/15 class Presentation 5%
Second Quarter Assessment
3/20/15 Final: Worksheet* 5%
4/3/15 Responsive Redesign of Portfolio 5%
4/10/15 CSS3 Collateral 5%
4/17/15 CSS3 Animatic 5%
4/24/15 Final: Modular Navigation 5%
Third Quarter Assessment
5/1/15 HTML5 Multimedia 5%
5/8/15 Final: Peer Review 5%
5/8/15 Forms 5%
5/15/15 WordPress CMS 5%
15/15/15 Final: Presentation 5%
Final Quarter Assessment
Two assignments dropped: -10%
Total: 100%

01 CSS3.org intro to HTML

This section is non-normative.

A basic HTML document looks like this:

<!DOCTYPE html>
<html>
 <head>
  <title>Sample page</title>
 </head>
 <body>
  <h1>Sample page</h1>
  <p>This is a <a href="demo.html">simple</a> sample.</p>
  <!-- this is a comment -->
 </body>
</html>

HTML documents consist of a tree of elements and text. Each element is denoted in the source by
a start tag, such as “<body>“, and
an end tag, such as “</body>“.
(Certain start tags and end tags can in certain cases be omitted and are implied by other tags.)

Tags have to be nested such that elements are all completely within each other, without
overlapping:

<p>This is <em>very <strong>wrong</em>!</strong></p>
<p>This <em>is <strong>correct</strong>.</em></p>

This specification defines a set of elements that can be used in HTML, along with rules about
the ways in which the elements can be nested.

Elements can have attributes, which control how the elements work. In the example below, there
is a hyperlink, formed using the a element and its href attribute:

<a href="demo.html">simple</a>

Attributes are placed inside the start tag, and consist
of a name and a value, separated by an “=” character.
The attribute value can remain unquoted if it doesn’t contain space characters or any of " ' ` = < or
>. Otherwise, it has to be quoted using either single or double quotes.
The value, along with the “=” character, can be omitted altogether if the
value is the empty string.

<!-- empty attributes -->
<input name=address disabled>
<input name=address disabled="">

<!-- attributes with a value -->
<input name=address maxlength=200>
<input name=address maxlength='200'>
<input name=address maxlength="200">

HTML user agents (e.g. Web browsers) then parse this markup, turning it into a DOM
(Document Object Model) tree. A DOM tree is an in-memory representation of a document.

DOM trees contain several kinds of nodes, in particular a DocumentType node,
Element nodes, Text nodes, Comment nodes, and in some cases
ProcessingInstruction nodes.

The markup snippet at the top of this section would be
turned into the following DOM tree:

The root element of this tree is the html element, which is the
element always found at the root of HTML documents. It contains two elements, head
and body, as well as a Text node between them.

There are many more Text nodes in the DOM tree than one would initially expect,
because the source contains a number of spaces (represented here by “␣”) and line breaks
(“⏎”) that all end up as Text nodes in the DOM. However, for historical
reasons not all of the spaces and line breaks in the original markup appear in the DOM. In
particular, all the whitespace before head start tag ends up being dropped silently,
and all the whitespace after the body end tag ends up placed at the end of the
body.

The head element contains a title element, which itself contains a
Text node with the text “Sample page”. Similarly, the body element
contains an h1 element, a p element, and a comment.


This DOM tree can be manipulated from scripts in the page. Scripts (typically in JavaScript)
are small programs that can be embedded using the script element or using event
handler content attributes
. For example, here is a form with a script that sets the value
of the form’s output element to say “Hello World”:

<form name="main">
 Result: <output name="result"></output>
 <script>
  document.forms.main.elements.result.value = 'Hello World';
 </script>
</form>

Each element in the DOM tree is represented by an object, and these objects have APIs so that
they can be manipulated. For instance, a link (e.g. the a element in the tree above)
can have its “href” attribute changed in several
ways:

var a = document.links[0]; // obtain the first link in the document
a.href = 'sample.html'; // change the destination URL of the link
a.protocol = 'https'; // change just the scheme part of the URL
a.setAttribute('href', 'http://example.com/'); // change the content attribute directly

Since DOM trees are used as the way to represent HTML documents when they are processed and
presented by implementations (especially interactive implementations like Web browsers), this
specification is mostly phrased in terms of DOM trees, instead of the markup described above.


HTML documents represent a media-independent description of interactive content. HTML documents
might be rendered to a screen, or through a speech synthesiser, or on a braille display. To
influence exactly how such rendering takes place, authors can use a styling language such as
CSS.

In the following example, the page has been made yellow-on-blue using CSS.

<!DOCTYPE html>
<html>
 <head>
  <title>Sample styled page</title>
  <style>
   body { background: navy; color: yellow; }
  </style>
 </head>
 <body>
  <h1>Sample styled page</h1>
  <p>This page is just a demo.</p>
 </body>
</html>

For more details on how to use HTML, authors are encouraged to consult tutorials and guides.
Some of the examples included in this specification might also be of use, but the novice author is
cautioned that this specification, by necessity, defines the language with a level of detail that
might be difficult to understand at first.

Assessable Tasks


Assessable Tasks

Assessable tasks are those core tasks required to create modern web design.

Tasks / Activities Date Requirements/Indicators
Marking-up Content Week 2 Is the markup valid and semantically correct HTML5?
Styling the Content Week 4 Is the CSS valid, clean, and using structural selectors when possible? Are various layout strategies used to construct the pages? Using CSS grids and/or flexbox is a requirement.
Constructing the Portfolio Site Week 6 Information Architecture Is the site logically laid out? Is it SEO friendly? Is the typography exciting? are fonts imported?
Is the web site Future Proof? Week 8 Is the website responsive to a change in viewport size, from an iPhone to the standard web browser?
Explore CSS3 and HTML5 Week 9-11 Are CSS3 used to create a unique final website?
Modularity and Interactivity Week 12-14 Are PHP and/or Javascript being used in the final website?
Forms Week 14 Does it have a submission form?

01 Intro to the Web

Clicking on the introductory text brings you down to the materials section.

Welcome to Web Design Basics


CSS is in the middle of changes that will eventually require me to adjust the way I teach the course. The changes have not yet settled down as I wait for best practices to become clear. In addition, artificial intelligence is changing the landscape, providing editorial, image, and design solutions and code to students where there had been none. It will take a while before the dust has settled. In the meantime, I’ve accumulated a lot of material through the years, so changing the course is easier said than done. I’ve integrated some of the new topics along with making sure that the old ways remain available. Extra credit to anyone giving me useful feedback on improving the website.

Collaborate, be compassionate, and creative!

Tim Berners-Lee, the person who founded the World Wide Web, posted an open letter on the web’s 35’s birthday (March 23, 2024) discussing the state of the web, affirming his original intention, the three Cs: the intention for collaboration, to foster compassion, and generate creativity, and criticizing its commercialization and monopolization. That is what the web is about. This is your community. Collaborate, be compassionate, and creative!

What do you hope to achieve this semester?

Write a few sentences expressing what you hope to achieve this semester, if you haven’t already done so in class. You should do this first thing before you read or hear how I will proceed. This will provide me with insight into what you expect, and will provide you with an indicator of your original expectations. You will post this on the landing page you will create next week.

Inspiration

Building a website opens you up to your target audience. Exposure to what you perceive to be your target audience is the biggest benefit of this course. Capitalize on that opportunity! It is not learning how to build websites, which is easy enough, and gotten easier with AI, but to use that knowledge to discover, target, and convert your target audience: to sell yourself. Use this course to position yourself within your professional horizon. It is an opportunity to organize, test out, innovate, secure and professionally develop yourself. The future will be shaped by AI. I expect you to use AI to help you confront that, and come out on top.

Let’s say your major is product design. When the instructor asks you to come up with a product idea, those ideas most likely originate out of your own interests, of what you want to do, or out of what you think your teacher requests. But by building a website to sell that project, you start thinking about the target audience. Who is the product for? How will they use it. How are similar products marketed? What can I learn from the competition? Do the research. Check out other websites. As the competition is established, they probably know a thing or two about how to reach their customers. This is the market you have to enter.

Working to define your target audience, figuring out how to best capture their attention, and selling your product will impact how you communicate whatever commercial art you are working on here at Parsons. Being attentive to the real world and targeting your work is the best way to initiate any product. Doing so will make you more competitive. A marketing strategy for your product will force you to create a more thorough and complete job from the outset.

The course demands you to think about your target audience. Who will use your website? Who are you building it for? This is an opportunity to think about, investigate, and target your work. Whatever your major: photography, illustration, fashion design, etc, your work will improve when you take your target audience into consideration. Building a website around that goal can only reinforce your concentration as to who your target audience is. Haven’t thought about it much? This is a commercial design school. You are being educated to solve the problems that other people want solved. You need to be clear as to what the problems are, so you can solve them. A website gets you into that space, so you can test things out.

What do I hope you achieve this semester?

I hope that this course will prime you to always consider your target audience for all your creative commercial work while at Parsons and beyond. Nothing keeps you from developing a website and marketing materials for whatever projects you will create from here on out.

I recently ran into the son of a friend of mine who picked up a new girlfriend who recently graduated from the fashion design program at Parsons. She did develop a generic website, using SquareSpace or Wix, I’ve forgotten. She did not investigate her target audience until the very last year, and was not prepared to market her work until the last moment. After telling her about this course, she wished she had taken something like this early on in her student career, so she could have been up and running by the time she graduated rather than figuring out how to do that after the fact. This course is about developing who you are and your professional career. Think of it as an opportunity and treat it that way. The real grade for this course is earned by who you become, not whatever letter grade on a transcript that few will ever take note of.

Grades

There are 20 assignments I use to grade your progress, but the main deciding factor is the progress you exhibit between the midterm assignments and the final. I expect professional looking, validated websites that take user experience into account. I provide feedback on your work throughout the semester, and grade everything at the end of the course, which allows for revisions to earlier or incomplete work without penalty. If you have any questions as to your standing in the course, please ask me. 

Everyone will not have had the same exposure to the plastic language of art, design, and graphic problem solving, and just because you can illustrate, in my experience, is no indication that your graphic design sense is any good. To help amend any visual literacy deficiencies, there is supplementary information and the vignelli Canon) to help everyone achieve visual literacy. My grade will not reflect the talents you do not bring to this class. I evaluate each person on their own terms, and do not compare students according to their fluency in design, etc. Seek help and advice from me or your peers, not only to solve problems in your code, but for visual and design issues as well.

Learning how to Code

Learning to code requires internalizing the rules and methods associated with HTML and CSS. You learn by coding. Internalize HTML and CSS by creating websites. Be ready to explore how to code. The World Wide Web is the teacher that has every answer. Effective web searches are a great way to understand the problems that you encounter.

Start with the basics and try it yourself. Take the initiative and build websites. The magic word is repetition. Your ability to problem solve with code improves with each website you build. The more websites you build, the better you become.

Chat GPT and an increasing number of AI competitors are available to help you code, create pictures, write copy, etc. Get to know them and take advantage of these resources. But first you have to be familiar with the basics of HTML and CSS, or you will have difficulty integrating the code they produce. I want you to use AI to help create websites that go beyond what you can code on your own. Your websites need to stand out, to be different from other websites, to reflect who you really are, and catch the attention you deserve. To need to learn how to hand code to make that unique and special website.

There are other ways to expedite the creation of a website, like using Twitter’s Bootstrap to realize your site. But you still need to have the basics down to take advantage of Bootstrap, and it takes time to learn Bootstrap that is not spent learning HTML and CSS. Though Bootstrap websites are professional, you cannot generate a totally unique site the way you can by hardcoding it.

Other programs don’t require that you know any HTML or CSS, and provide an InDesign-like interface experience. I’ve had students use Webflow, for example, and the websites looked professional. But the time it takes to learn such a program is better spent learning how to code. It provides you with much more flexibility in the end, and you still have to enter all the same information, just in an interface that you have to learn.

I haven’t used Adobe Dreamweaver in a long time, but I’ve used it at an ad company many years ago. They did not use the ‘what you see is what you get’ design interface, only using it as a development platform, because of its tight integration with the other adobe apps that the rest of the creatives used. I don’t know if Dreamweaver is still in use, but you are better off using your time to learn to code by hand.

Plagiarism

You are free to use any and all artificial intelligence and other web and code services to create your work. You can beg, borrow, and steal, just let me in on it, and be able to defend it, if I ask questions. By that I mean that you understand what the code is and what it is doing. The one requirement, if you use outside help, that you document where your code comes from. I will consider it plagiarism if you don’t, which can result in a) failure of the assignment or b) failure of the course, with multiple instances leading to possible suspension or even being expelled from the school. This is from the The New School Academic Honesty And Integrity Policy, so don’t pass off as yours what someone else created.

Document everything that you have not directly created and let me know what services you have used, etc. Most every service can be traced back in the structure of the code, but I prefer to know ahead of time where everything came from, rather than having to figure it out. That makes it easier for me to evaluate you on the basis of the code you write, and not the code you did not write.

Course Design

You only learn to code by doing it. My aim is to get everyone coding by the midterm, so you can practice coding on your own projects for the rest of the semester, with the strategy that you grow secure in your ability to code by the time you leave this course. I front-load the course. That means the first half of the course is demanding and requires you to keep up with the work. I ease up in the second half of the course, to give you the freedom to apply what you have learned on your own projects, or to catch up if they did not fully finish everything by the midterm. This format works for most students. Some students wish I would continue to provide guidance in the second half of the semester. I may figure out additional projects, but if I don’t, and if you are one of those students, ask me, and I’ll be happy to assign additional guidance, projects, and whatever it takes to keep you engaged. 

Seniors can choose to spend the entire course developing their portfolio or senior projects (instead of the final assignment, where everyone else has to sell something other than themselves.) I recommend you to sell something other than yourselves, as that allows for a more effective application of your creative talents. By completing the course successfully, you should be able to build a better portfolio website in short order. You’ll learn more when you’re not stuck on the same project for the entire 15 weeks, and portfolio websites are rarely complicated enough to warrant the extra time. But I understand the pressure to build out and perfect one’s portfolio site, so the option is there.

Easy access to artificial intelligence (AI) transforms this course, since it is possible to get the chat bots to write code for you. But to take advantage of that, you need to understand how to code, to integrate what it produces. While there are no restrictions of the use of chat bots to create code for you, you are to attribute where the code came from whenever you do not write the code yourself, be it from a website, or if a chatbot helped you write the code. This can be done using the comment element.

Why learn how to code websites by hand for the web? There are many website builders that allow a person without much prior knowledge to create a good-looking website without hand coding HTML or CSS. The tradeoff is that these web experiences use templates, making it more difficult to differentiate yourself from other web experiences. In today’s competitive world, to stand out in a captivating way is a plus. 

You should be able to follow me in class and glean most everything you need to learn how to code. If not, the course portal has your back.
 

This website is here to help you. Use this portal to help you catch up when you’ve missed a class or need a reminder later on. All the lectures are written out. If you have trouble with a topic as presented in class, read the topic on the website, and follow the links and examples. 

Make up the material of a missed class before the next class. Students entering the course after the first or second lectures need to read all the material as soon as possible and complete all assignments to catch up with the rest of the class. 

Much of the learning takes place as you write code. Learning to build websites is a cumulative effort: basic skills are necessary for building advanced skills. Watching me write code is not the same as writing code yourself. You start learning when you try to overcome the mistakes you have made. Don’t be intimidated. Start simple and you will become more adventurous as you gain confidence. Most of you will be wondering what all the fuss was all about by the time the midterm arrives. 

The scope of this course is coding HTML and CSS with a smidgin of PHP and JavaScript thrown in. A student needs a solid foundation in designing and developing HTML and CSS before they deploy JavaScript to develop behaviors. That makes it optional. Anyone can use existing JavaScript code, and if you already know the language, don’t let me stop you.

If you missed a class or do not completely understand a topic well enough to move on, go back to the supporting material. If you have difficulties understanding the material or completing your homework, email me or visit the Learning Center. I recently found out that the department has students available for you to ask questions at the Design Lab located on 10th Floor of 2 W 13th Street. Just go in and there should be people there to help you with your code. This may be better help than the university learning center.

In-Class Code Checking

Class Assignments require me to personally check your code in class for correctness. Many of you have laptop screens and display the code in small type, or reverse the color. While I want you to set your preferences that work best for you, these issues make it difficult for me to find that needle in a haystack, which is what it is like to discover errors in existing code. To facilitate my correcting your work, please increase the size of the code so I can easily see it, use black text on a white background, and move your laptop to the side, so I can sit directly behind it. The corrective glasses I wear operate optimally at a specific distance two or so feet from the screen.

I mention this because it is possible that I encroach on your personal space as I situate myself to read your code, and I would prefer not doing that. This is especially important if you are sensitive about your space. Some people are more sensitive than others. I work to be respectful of everyone, knowing that there are many personal and cultural differences at play. Please make sure I can view your code in a way that is both comfortable for me and for you.

Do not hesitate to ask or email me if you have questions.

I am always surprised by the number of students who do not ask me for help when they are having problems. You can always ask me, email, me, and we can schedule a zoom to figure out what the story is. The answers can be found in this website, or on the web. Write full sentences in Google Search to ask your question, as in “how do I create a link in HTML.” Or just ask a chatbot. If you can’t figure out the problem on your own, ask me. There is so much information that it’s not always easy to connect it all with what you need at that moment. So you get stuck. Know that most of the mistakes happen in the first four weeks of the course. Use validator with some frequency to catch any issues as you code. Sometimes in CSS the mistake happens right before the css code that does not work. By the midterm, the mistakes will mostly disappear.

Book time at the Learning Center. How to make an appointment. and schedule an appointment.. They can help you understand and overcome the problems you are facing, help you code your final project, and keep you organized and working. Or check out the Design Lab located on 10th Floor of 2 W 13th Street. Just go in and there are people there help you with your code.

There are many resources on the web from which to learn how to code. Do make sure that the information is current or you will be learning ways that are no longer practiced. A comprehensive resource is Mozilla’s Mozilla developer network (MDN) which includes individualizedAI Help. Also look into Google’s Chrome Developer Relations web.dev. The important thing is that you practice writing code and to do it often. The only way to learn to write code is by writing code. Making mistakes is part of the process. The mistakes that stop you dead in your tracks disappear after a week or two of doing the work. Do not become discouraged when you get stuck. There are many ways to solve most problems. Take a step back and try again. Use validator to help you avoid mistakes. 

And what if you do not like my teaching style or this website?

There are people who cover the basics from the beginning. CSS Tricks is Chris Coyer’s website and a great resource for all things for building websites. His Where do you learn HTML & CSS is 2020 is a great place to start. But many people attempt to communicate the basics, like How to Build a Website with HTML to help you learn the basics. I googled that and there is so much more so finding alternatives to me is easy enough.

The real grade for the course

The grade that goes on your transcript is not as important as learning the basics of web design well. You could gain a career out of front-end web development, as previous students have. You are planning to enter the workforce, a good website can only help. Whatever you want to do with your life is at stake. Work as if that is the case, and your grades will be fine. Everyone is different. Not everyone needs to sell their creativity on the open marketplace. I will be grading you on your work, and will not be comparing you to others in the course. I look to see how much each person improved from the first assignments to the last. It is easy to see the effort in your projects, and effort counts.

Getting Help:

  1. Ask questions during the lectures and code demonstrations in-class.
  2. Read and watch videos on the website.
  3. Do the homework.
  4. Validate your work often. This will keep you from making mistakes.
  5. Email me whenever you have questions.
  6. Search the web for solutions. Type the solution you’re looking for in complete sentences.
  7. Visit the Design Lab located on 10th Floor of 2 W 13th Street. Just go in and there should be people there to help you with your code.
  8. ask a chat-bot for help, or to solve the problem for you.
  9. Visit the Learning Center. They will help you with your homework. Slots are limited, so sign up in advance.
  10. Watch Lynda.com video instruction. 
  11. Book is optional. It is ancient and I don’t refer to it in the course. HTML5 & CSS3 Visual QuickStart Guide (8th Edition). Some students like to read a book, and if you are one of those students, please use this or any other HTML/CSS book to do so. 

About this Website


I present each class systematically. Figuring out the topic, the information you need, the homework, and support files, is straightforward. Otherwise, you can use the search bar at the top of the window to find what you are looking for.

The fixed menu on the right-hand side covers every class, in addition to often used reference websites. Clicking on the link loads the class page. I structure each page in the same way, except this one, as it has welcome information. 

A shortcut to each class, the associated pages, and to the homework is available on the top menu.


Week 1
1/26

Introductions. Overview of course, course objectives, outcomes and expectations. Go over syllabus. Introduce hypertext markup language. Activity: Analyze Website. Activity: Create HTML file, start first assignment in class.

Homework

Write out expectations for the course. Use OpenAI to interrogate your future plans. Read Why Do All Websites Look the Same? Watch introductory videos. Analyze the elements of a website. Create a content sheet for the main page of a site that epitomizes the design field you are in. Write down the goals of the site. Use images. Mark up the assignment.. Due: Next Week. Email me if you have questions.


Next up are the goals and outcomes of this course. This is what you are to learn.

Much of the learning is scaffolded, meaning that what you learn is a necessary part of a larger skill set that you need to be familiar with. These learning outcomes need to be acquired before the next class meets, as it likely assumes this knowledge and builds upon it. If you miss a class, you are responsible for making up the class you missed by going over all of the information.


Goals

The goals of this unit are to:

  • Introduction to the World Wide Web.
  • Understand the content strategy that goes into creating websites.
  • Learn how to mark up content.
  • Set up a server at Parsons/New School using Fetch.
  • Start first assignment page on the web.

Outcomes

At the end of this unit, students will:

  • Be familiar with the web and the code that generates web pages.
  • Understand the elements that make websites work.
  • Learn basics of HTML and CSS.
  • Mark up a simple page.
  • Set up server space at b.parsons.edu.
  • Publish a page on the web.

    If the class did not cover all of these topics, relax. They will be covered next week.


The topic summary and homework assignment are followed by a materials section that has all of the linked files associated with the course.

Green and red colored links are required reading.

Green signifies conceptual overview that helps put the material in perspective.

Red signifies core knowledge that you need to know to continue. That means you should reread the material if you do not understand, or read the corresponding chapters in the book.

Links without color are suggested readings, but not required.

The homework link takes you to the homework for the week.


Additional material for this unit can be found by following the following links:


The estimated breakdown of time it should take for each topic to be adequately covered in class. Some topics are summarized in a few minutes. Others are demonstrated at length. Emphasis is on those topics that help you master the skills needed to build web pages, which are usually done through in-class activities. What is said and done in class overrides what is written here.


Step-by-Step

15 Welcome, write a few sentences about your expectations for the course as we go through the introductions, and go through the syllabus
5 Overview of the course and class portal.
25 Exploration of the web. Peek behind web page to look at the code.
15 Activity: Create content by writing.
10 Break
30 Demo/Activity: Marking up the content. Writing HTML
15 Tools of the Trade
15 Get server space set up.
5 Go over Homework assignment
10 Q&A

Learn By Doing

Paying attention in class is half the battle. Putting into practice what’s covered in class is the other half. Each class teaches a necessary skill. It is your responsibility to learn it. 

  • Code a little each day, not a lot once in a while. You’ll get over the frustration soon enough. Coding web pages is not so difficult once you get over the minor mistakes that everyone makes when they start. 
  • There are two major assignments: a midterm portfolio and a professional, standards compliant, website that sells a product for the final.
  • Validate!


    Why validate?

    The core reason to run your HTML documents through a conformance checker is simple: To catch unintended mistakes—mistakes you might have otherwise missed—so that you can fix them.

    Validate your work often! The validator is your friend that will point out your mistakes.

    There are alternatives, like Validator.nu, an alternate address for CSS validator, and direct CSS input.

    Go beyond validation by measuring your page quality using web.dev’s web page audit. It will measure your performance, accessibility, best practices, and Search Optimization, give you hints on how to fix it, and teach you how to do it better as well.

    Do not be alarmed if there are 50 mistakes. That can happen if you haven’t been using the validator as you should. One mistake can flag a lot of other issues. Fixing one problem can make other problems disappear.


    Many of the units point to a number of websites that exemplify current practices. This helps you see how the web implements the topics discussed in class.

    Current Practices

    A lot of websites deserve to be looked at as standard bearers for the web. A few that have stood the test of time:

    • CSS Zen Garden Original CSS experiment in 2003 that explores what is possible using CSS and galvanized the web toward standards compliant websites.
    • The Rijks Museum opened the floodgates for the new single page jQuery web design experience. Others had come before but it pushed behaviors over the top. The user experience and content interaction are impeccable.
    • NY Times The New York Times soon followed. A standard setting newspaper that helped move the web away from its addiction to tables in 2007 has just been redesigned using jQuery animation. Follow the link to see how design considerations led to a more engaging web experience.
    • The New School Jumped onboard with the JQuery look in 2014 as well. It’s redesigned the website several times since then. The Parsons Web Site.
    • Apple helped define design as the central tenet of computer usage and did so against the establishment for many years. Now it is the establishment. Its website is has remained similar for many years. It is sparse, to focus on what is important while hiding a site of vast complexity.
    • Facebook Not for what it looks like but for having taken over such a big part of the web. It has walled off a large section of the web and privatized the experience. The privacy is good for users, who feel free to share their experiences with friends and family. Except there is a back door. Facebook shares details with corporations to target advertising and government spy agencies. That’s not all they collect, so watch out what you say or do. That’s the price of freedom, or so they say.
    • The Bulletin of Atomic Scientists: How a nuclear war would kill you — and almost everyone else.
      In a nuclear war, hundreds to thousands of detonations would occur within minutes, resulting in tens to hundreds of millions of people dead or injured in a few days. But a few years after, global climatic changes caused by the many nuclear explosions could be responsible for the death of more than half of the human population on Earth. Good use of multimedia and paralax effect to tell the story.
    • The Armed Conflict Location & Event Data Project exemplifies information design.

    There is nothing like examples to motivate your own work. Be motivated to do your best. You are the one who gains from learning these skills. I’ve had students, like Urara Ito, who entered the industry after taking the class.


    The last item on the first few pages contains definitions for words used in the class that you should be familiar with.

    Definitions

    These are the terms that participants should be familiar with during this unit:

    The W3 organization definitions of HTML, XHTML and CSS:

    HTML (the Hypertext Markup Language) and CSS (Cascading Style Sheets) are two of the core technologies for building Webpages. HTML provides the structure of the page, CSS the(visual and aural) layout, for a variety of devices. Along with graphics and scripting, HTML and CSS are the basis of building Web pages and WebApplications.

    What is HTML?

    HTML is the language for describing the structure of Web pages. HTML gives authors the means to:

    • Publish online documents with headings, text, tables, lists, photos, etc.
    • Retrieve online information via hypertext links, at the click of a button.
    • Design forms for conducting transactions with remote services, for use in searching for information, making reservations, ordering products, etc.
    • Include spread-sheets, video clips, sound clips, and other applications directly in their documents.
    With HTML, authors describe the structure of pages using markup. The elements of the language label pieces of content such as “paragraph,” “list,” “table,” and so on.

    What is CSS?

    CSS is the language for describing the presentation of Web pages, including colors, layout, and fonts. It allows to adapt the presentation to different types of devices, such as large screens, small screens, or printers. CSS is independent of HTML and can be used with any XML-based markup language. The separation of HTML from CSS makes it easier to maintain sites, share style sheets across pages, and tailor pages to different environments. This is referred to as the separation of structure (or:content) from presentation.

    HTTP

    The Hypertext Transfer Protocol (HTTP) is a networking protocol for distributed, collaborative, hypermedia information systems.[1] HTTP is the foundation of data communication for the World Wide Web.

    FTP

    File Transfer Protocol (FTP) is a standard network protocol used to copy a file from one host to another over a TCP-based network, such as the Internet.

    01 Tools of the Trade

    All that is needed to code for the web is a text editor. Everything we do is coded by hand. For learning how to code, it is best to write the code itself with a simple Text Editor so that the repetition helps you to remember. Once you know what you are doing, you can use amore advanced editors. No authoring programs like Adobe Dreamweaver or Muse.

    It’s our preference to use a text editor, like HomeSite, TextPad or TextMate, to “hand code” everything, rather than to use a wysiwyg what you see is what you get HTML and CSS authoring program, like Dreamweaver. We just find it yields better and faster results.

    Khoi Vinh, Design Director at NYTimes.com from NY Times Article

    Text Editor

    The text editor, the browser and FTP program are all you need to build web sites. Do not use Microsoft Word or another word processor. There are many text editors. I prefer a simple HTML/CSS dedicated editor with live preview. Brackets is the most straightforward, simplest, and easiest editor with a built in preview. You can also use the Phoenix in browser editor (currently only works with the Chromium based browsers). Atom and BBEdit are other HTML centric editors.

    Other editors are for general programming, and target all kinds of programming languages. They are good but can be more confusing to use, like Microsoft’s Visual Studio and SublimeText.

    The Browser

    Any of the standards compliant browsers can be used. Chrome is most popular, Firefox is the best, and Safari plays nicest with the OSX operating system. Every other browser runs on the Chrome engine. In Safari, go into the Preferences -> Advanced tab and select Show Develop Menu in the menu bar to get the development goodies to show. All browsers allow you to inspect the code with the browser development tools. Right click, select Inspect, to zoom into the code that describes the document at the point where you click. If you have never done that before, please explore the code behind the websites you browse.

    HTTP

    Hypertext Transfer Protocol (HTTP) is a protocol for transmitting hypermedia documents, such as HTML. It was designed for communication between web browsers and web servers, but can be used for other purposes. HTTP follows a classical client-server model, with a client opening a connection to make a request, then waiting until it receives a response.

    SFTP using Fetch or FileZilla

    Uploading your files to the server requires a Secure File Transport Protocol (SFTP). The application that does that for Mac users is Fetch. With it you can upload and download files onto your web space at school. Fetch was created at a university and is free to all students. You can get your free license here. Fill out the form, use the Parsons mailing address 66 5th Avenue, New York 10011, and they will send you a serial number to use with Fetch.

    FileZilla is a cross platform SFTP program for students using windows. Instructions for connecting and transferring files using Fetch and FileZilla are available near the bottom of the page. 

    Other SFTP programs available on both the Mac and Windows operating systems are CyberDuck, WinSCP, Fugu, and Transmit.

    Publishing Your Work using Fetch

    Everyone will publish their work on the web. We start by making sure that everyone can. The software most of you will use is Fetch. Don’t forget to register the product. It is free to all students.

    The server space is a lot like your desktop, only instead of folders, like on OSX, they are called directories. These servers are usually run by computers running Unix or Linux. These operating systems do not tolerate spaces. Lower case letters and capitalized letters (a and A) are not the same. Follow those rules to minimize problems uploading files to the web.

    You can drag and drop between the Finder window and Fetch. When you drag the same document into Fetch, the existing document will be overwritten without warning. This is default behavior. Always keep your latest version on your hard disk, where it can be backed up, rather than online, where you can accidentally over-write it.

    If you need more help, visit the Fetch help pages

    Setting Up Your Domain

    The domain is the name that you type in to get to the website. All websites are known by their number, but to make it easier for humans, they allow us to connect a domain name to that number. You can get you own, or by default, you will use the Parsons.edu domain.

    Everyone has server space at Parsons. The domain is hosted on the Parsons B Server. It looks like http://b.parsons.edu/~dejongo/. I have already created a page that has a link to the parsons folder I want you to set up. You can mask a domain name to that space. Alternatively, you purchase your own server space, you will need to register a domain name. Cost is approximately $15 a year for the domain name and renting server space ranges from $12 to $120 a year. Many hosting services include the cost of the domain name with the hosting plan.

    Setting Up Your Server Space at Parsons

    Art, Media, and Technology B.PARSONS.EDU user accounts are set up when I send a list of student names to the IT Department. They use the standard New School identification: last name with first initial and numbers that you are familiar with, prefaced by http://b.parsons.edu as your user account.

    You will be sent an email once the IT department has created your account. The email is from: root and the subject is something like: Important AMT B.PARSONS.EDU [user ID]. SAVE THIS E-MAIL!

    This email may have entered your spam folder, which can make it difficult to find. Please find the email and follow the instructions to set up your server space.

    The email will contain your B Server address, user, and password. You need to have your b.parsons.edu address and your B Server password to access your server space.

    If you have questions, or if it does not work, you should check to make sure address, name and password are typed in correctly. If it still does not work, enter a service request. Click on the link to Submit an IT Service Request at the top right of the page. Please have tickets assigned to Enterprise Systems group. Include your Last Name, First Name, Net ID, email and a request to ask about your server space on the b.parsons.edu server. You can also email the IT department to create a ticket.

    Getting your Own Host and Domain Name

    A lot of hosts give you a free domain if you subscribe. I personally use DreamHost, as they host non profit sites I work on for free. Their price is more expensive.

    One host I’ve run across is Ebound hosting, which has a great intro plan that costs only $1 a month. They also have an unlimited plan that gives you everything for under $5 a month including domain name for the year, multiple domains and all the usual goodies in spades. Their help response was quick and resolved all problems the one time I had to use them. Give them a try.

    Their cost, with a three year plan, is $4 a month, and that includes a lot of goodies, including a domain free for the first year. Search the web for a discount. There is a 25% discount using this code: EBH25 at the time I write this. I have no connection with Ebound hosting but in calling them to solve a problem, a real human answered on the second ring. That’s amazing these days.

    Finally, to get you started, you can host for free at biz.nf but their plans are more expensive over the long run than what you get with Ebound hosting. I’ve kept a number of domains for over 20 years, so the costs add up.

    Purchasing a Domain Name

    Registrars like name.com or Moniker, both of which I’ve used. there are a lot of accredited registrars

    You cannot point a domain to your New School or Parsons server space but you will be able to mask your domain to these accounts. That means a frame is created with your domain name above the address bar but it actually shows the school website, which appears in that frame.

    Connecting and Uploading Files to your Server Space

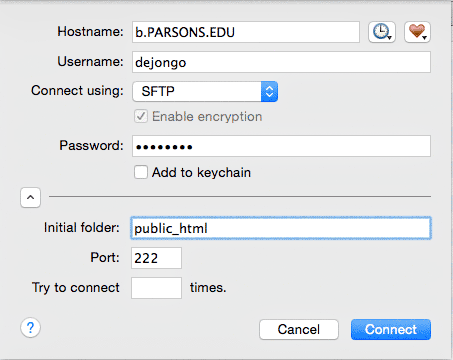
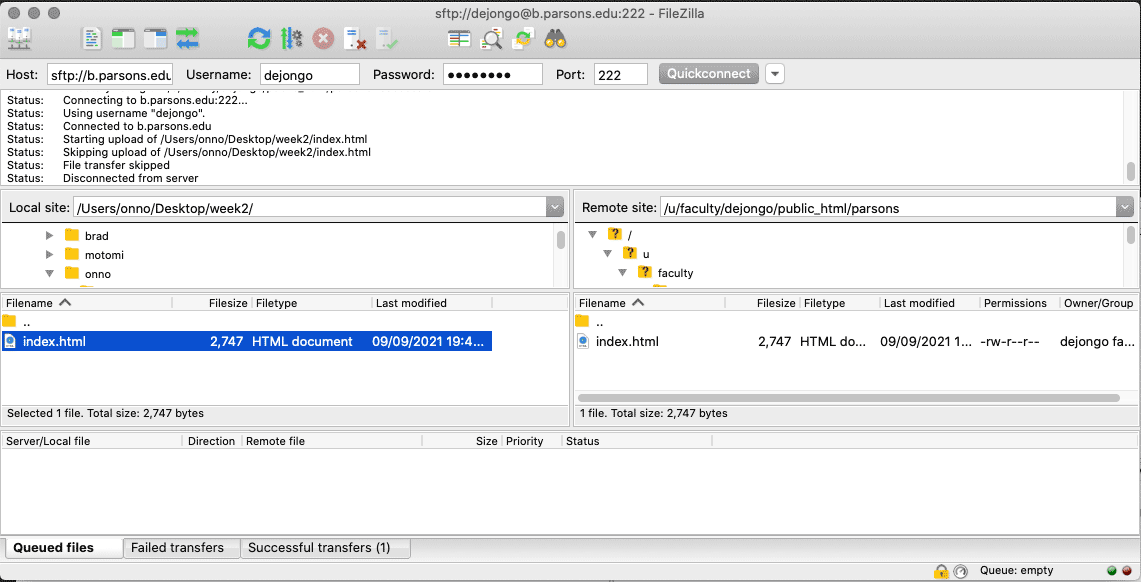
    To access your files using Fetch, fill out the Hostname with “b.parsons.edu” then fill out Username with your Newschool ID, set your connection to SFTP. Fill in your password. It can be found on the email from root. Set the port to “222” and your initial folder to “public_html”. You should be able to log on.

    how to fill out Fetch

    On Windows using FileZilla or on Macs that have trouble connecting to the server using Fetch from school or home, enter sftp://b.parsons.edu for Host, your username with your New School ID, the password as found on the email from root, and port: 222. That should work. In the left hand pane locate directories on your hard disk which contain the files to be transferred, and transfer them to the right pane representing your server space.

    how to fill out Filezilla

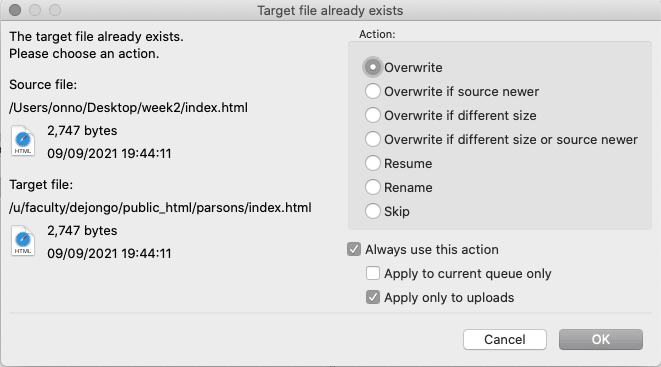
    You will be asked to confirm overwriting the file, which is the standard option. Check “Always us this action” and “Only apply to uploads”.

    how to fill out Filezilla

    The server is laid out much like your hard disk. You will drag files from the finder into Fetch, as if it were a local window. The main difference is that Fetch will not warn you when you are overwriting your files. This is a good thing, as you will be dragging your files from your desktop to the server and overwritten the old files with new files the whole semester long.

    The second difference is that upper and lower case letters are completely different, and have nothing to do with one another. On your hard disk, it makes no difference. On the server, your links will not work. My suggestion is to name all files using lower case. Do not use spaces in file names!

    On the parsons B Server, you need to place all your files in the public_html folder. Different hosts can designate different names for this folder.

    Setting up your Server Space

    I expect you to use your root — public — directory for your own purposes. The class works out of a folder called “parsons” with a lower case p. Case matters! Create a new folder and call it parsons lowercase p in the root directory. That is where you will develop all of your work for this class. As there is a midterm with associated assignments and a final, create two folders a portfolio and a final folder.

    Web Site Organization

    web site organization

    Index.html and Worksheet.

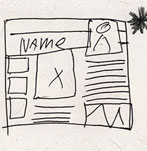
    You will create an index.html page inside of the parsons folder done in-class during the second week that will contain the links to each of your assignments, a photograph of yourself, along with your name and your major and minor, if you have one, so I can associate your work with you as a person.

    Your first assignment example counts as research for your portfolio. It could go in the portfolio folder or stand alone. A work-file inside of the portfolio example and final assignment folders example will serve as your worksheet. This is where you document your creative development in at least seven steps. Update these work-files with all of the work you do to get to your final. This includes old ideas even when you change your mind and start working anew. That way I can assign credit where credit is due.

    The landing page for each student needs to work exactly the same. This is how I make contact with your work. I will be going to this page to check up on your progress, so keep it current. Your grade depends upon it. Homework needs to be up the day before class — so I have some time to check it before teaching, for issues that can then be addressed in class.

    01 HTML5 Template

    Select all the text and paste into blank text editor document. Template 1 contains most used HTML5 elements. Template 2 does not. Text is at 25% so it can be easily copied. Make sure you copy all of the text.

    Template 1

    <!DOCTYPE html>
    <html lang="en"> 
    <head>
    <meta charset="utf-8">
    <title>title</title>
    <!-- Sets viewport to the device screen size -->
    <meta name="viewport" content="width=device-width, initial-scale=1, maximum-scale=1">
    <!--Link an external style sheet-->
    <link href="css/styles.css" rel="stylesheet">
    <style> 
    	main { max-width: 1500px; }
    	section { max-width: 1000px; margin: 10px auto; padding: 0 20px; }
    	img {width: 100%}
    	figure {width: 25%; margin: auto;}
    /* Overrides desktop style when viewport is less than 600px (for smart phones) */
    @media only screen and (max-width: 600px) {
        
    }
    </style>
    </head>
    <!-- body -->
    <body>
    <main>
    <section>
    	<header>
    		<h1>Heading 1</h1>
    		<nav>		
    			<ul>
    				<li>
    					<a href="#">
    						navigation as unordered list item
    					</a>
    			</ul>		
    		</nav>	
    	</header>	
    	<article>
    		<h2>Heading 2</h2>
    		<p>The <strong>template</strong> contains <em>most used</em> HTML5 elements. Replace this text with the content written for the first assignment. Notice that there is no closing tag for this paragraph or for the list item in the navigation above.
    		<figure>
    			<img src="http://b.parsons.edu/~dejongo/12-fall/stuff/01-blocks.gif" alt="blocks" >
    			<figcaption>Blocks. The figure tag make adding a caption below the picture possible. The picture tag makes multiple pictures possible, and places the img, an inline element, in a block element. </figcaption>
    		</figure>
    	</article>	
    	<footer>
    		<hr>
    		<p>Resources
    		<ul>
    			<li> HTML <a href="http://b.parsons.edu/~dejongo/01-writing-html5/#inline_elements"  >inline</a> and <a href="http://b.parsons.edu/~dejongo/01-writing-html5/#block_elements"  >block</a> elements. 
    			<li> Writing <a href="http://b.parsons.edu/~dejongo/03-the-mechanics-of-css/" >CSS</a>, <a href="http://b.parsons.edu/~dejongo/03-applying-css/"  >examples</a>, <a href="http://b.parsons.edu/~dejongo/04-the-layout-modes/" >layout</a> and <a href="http://b.parsons.edu/~dejongo/05-styling-the-navigation/" > styling the navigation</a> 
    			<li><a href="https://validator.w3.org" >Validate your page</a>
    			<li><a href="https://web.dev/measure/" >Page quality audit</a>
    		</ul>
    	</footer>
    </section>
    </main>
    </body>	
    
    </html>
    

    Template 2

    <!DOCTYPE html>
    <html lang="en"> 
    <head>
    <meta charset="utf-8">
    <title>title</title>
    <!-- Sets viewport to the device screen size -->
    <meta name="viewport" content="width=device-width, initial-scale=1, maximum-scale=1">
    <!--Link an external style sheet-->
    <link href="css/styles.css" rel="stylesheet">
    <style> 
    /* Overrides desktop style when viewport is less than 600px (for smart phones) */
    @media only screen and (max-width: 600px) {
        
    }
    </style>
    </head>
    <body>
    </body>	
    
    </html>
    

    01 Writing HTML5

    HTML stands for Hyper Text Markup Language. If you wish to see the entire specification in a one page version (large document), visit the living standard

    Content is “marked up” using tags to designate the structural significance of that content. Each piece of content so marked up constitute an HTML element, of which there are many.

    A first level header is designated by opening and closing tags: <h1> 01 Writing HTML5 </h1>. All parts of the document are marked up with such tags to create HTML elements, even parts that you cannot see but still describe the document, such as the meta tags found in the header, or the <style> and <script> tags that contain CSS and Javascript.

    To create an HTML page, open a text processor. Creating a new file and call it index.html when saving. The file needs to be called index.html with a lower “i”. It is the index of the directory in which it is located. It will be the file that is opened upon entering that directory.

    Every directory should have an index.html file, as some web servers allow visitors to see the content of the directory when there is no index.html file present. Other files in the directory can be reached by placing links connecting that page on the index.html page.

    The following elements make up the HTML page:


    The Structure of an HTML Document


    The Doctype

    The doctype has been greatly simplified in HTML5. The DOCTYPE tells the browser the version of the HTML rules the document will follow. Using the following DOCTYPE tells the browser you will be using HTML5. This is the only DOCTYPE I expect to see.

    <!DOCTYPE html>
    

    The HTML Element

    The HTML elements contains all other elements. It is the root element, and the language attribute is specified as English.

    <html lang="en">
    

    The Head Element

    The head element contains information about the content but not the content itself. This is known as the document;s metadata. The head element does not get displayed in the browser window.

    The Character encoding declaration specifies the encoding used to store or transmit the document. The Meta tag charset=”utf-8” tells the browser to use the unicode universal character set transformation format—8-bit.

    The title shows up as the title of the browser window.

    <head>
    	<meta charset="utf-8">
    	<title>Name</title>
    </head>
    

    The header element closes before the body element opens.

    The Body Element

    Markup written in the body element shows up in the viewport, or browser window. Think of this element as encompassing everything that appears in the browser window.

    Everything you write comes between the opening and closing body tag. In the following, only “Hello World!” will show. Comments are not rendered by the browser.

    <body>
    <!-- Comment your Work! -->
    <p>Hello World!</p>
    </body>
    

    The body element closes before the html element closes.

    The Closing HTML element

    Closing the HTML element is the last tag on the page. It closes the tag that holds all of the other elements in the document.

    </html>


    Element or a Tags?


    An element is a single “chunk” of code comprising of a start and ending tag. They are representations of a thing for the browser, an object. Elements have all kinds of properties for the browser, like firstChild, etc.

    <div>This is a div element</div>
    

    Tags is the opening and closing code of the elements. <div> is a tag. <div>content</div> is an element.

    Elements are not tags. Some people refer to elements as tags (e.g., “the P tag”). Remember that the element is one thing, and the tag (be it start or end tag) is another. For instance, the HEAD element is always present, even though both start and end HEAD tags may be missing in the markup.” From W3 HTML specification


    The Inherent Structure of HTML


    HTML is concerned with the structure of the content, and not with how the content should be displayed.

    The natural flow of content is inline, meaning that content flows horizontally, like the letters on a line of text. In English, that is from left to right but it could be in any direction.

    In addition to the horizontal inline flow of content, elements can be determined to be block like and flow vertically. Block elements do not flow like characters but like paragraphs, as entire blocks of text. By default, their width expands to fill the parent element and the flow is vertical. They flow down the page, starting from the upper left hand corner.

    In HTML, block elements cannot descend from (be a child of) inline elements. Inline elements are the content of a block element.

    CSS can change the display property of an element. It can make inline elements display as block elements, and block elements display as inline elements. That is very useful, usually to make inline elements act like block elements.

    Valid HTML requires that block level elements do not descend from inline elements. Changing the elements displays with CSS does not change the validity requirements of the HTML document.

    Tag Attributes and Values


    Tag Attributes

    HTML tags can take attributes, which describe certain aspects of the elements, with different elements having various assigned attributes. There needs to be a space between each attribute. Attributes for the img tag, for example, are src, width, height, class, and alt.

    Example: <img src="file_name" alt="logo">

    Example: <a href="file_name">File Name</a>

    Values

    Every attribute has a value, even if it is an empty value. For example, the value of the src (source of the image) is the location and name of the image. While it is no longer a requirement to put either double or single quotes, as long as there are no spaces or other non-alphanumeric characters, it still best practice to do so.

    Example: <img src="file_name" alt="logo">

    Example: <a href="file_name">File Name</a>

    Role Attributes

    The role attribute describes the role(s) the current element plays in the context of the document. In the official language of the W3 “The XHTML Role Attribute allows the author to annotate XML Languages with machine-extractable semantic information about the purpose of an element. Use cases include accessibility, device adaptation, server-side processing, and complex data description.”
    Example: <nav roll="navigation">

    Understanding the Tag Hierarchy


    DOCKTYPE

    html

    head

    meta
    title
    style

    body

    main

    header

    nav

    ul

    li
    li
    li
    li

    section

    article

    h2
    p

    p

    img

    figure

    img
    figcaption
    p
    footer

    HTML is a collection of elements arranged in a kind of containment hierarchy. This is a parent – child relationship, where the enclosing tag is the parent of the enclosed tag, which is its child. The entire structure can be likened to a tree, with the <html> tag as the single trunk from which the rest of the branches arise, first splitting into the two main branches, the <head> and the <body>. inside the body tag are all of the other branches that make up the document.

    After the <doctype>, the HTML document starts with the <html> element that contains all other elements. It contains only two tags, the <head> and the <body> tags.

    The <head> tag contains information about the page (meta-information) but that is not visible, like the <title> tag, <meta>tags and <html>, <style> and <script> tags and links <link>to styles and scripts.

    The <body> tag contains all of the content, everything that’s visible in the browser window. The tags are usually several levels deep. Nesting tags is very useful, for it groups elements together. This makes it easy to create the different parts of the layout.

    In the figure on the right, the <wrapper> contains all of the other visible content. This element is usually given automatic margins that center it horizontally in its parent tag, the <body>. If the <wrapper> is moved to the right, all the child elements contained within it are moved to the right as well.

    Because each element is a child of another element, there are only clearly determined paths. For example, the <img> is a child of <p>, which is a child of <article>, which is a child of <section>, which is a child of <wrapper>. The complete path of the <img> tag is html body wrapper section article p img. This path would select all images in the paragraphs contained in article, section, wrapper, body, html. Since there are no other images, only the image with the red background is targeted by this path. The <img> in the figure has a different path, for example.

    How to Write the Code


    A tab is used to show how many levels the code is nested from the <html> element. This results in a visual way to check if the code is nesting properly. The code should look like :

    <html>
    	<head>
    		<title>title </title>
    	</head>
    	<body>
    		<main>
    			<section>
    				<header>
    					<h1>Headline for Page</h1>
    				</header>
    				<article>
    					<p>content
    				</article>
    				<footer>
    				</footer>
    			</section>
    		</main>
    	</body>
    </html>
    

    To make it easy on you, there are tools that let you clean up your hierarchies automatically. You’ll want to remember this link right before you hand in your midterm and at the end of the semester, when you hand in your final.

    The DOM


    how your browser renders websites
    how your browser renders websitessource

    The HTML file with all of its codes and content gets parsed by the browser. The syntax of each tag will be analyzed to see how it fits together according to the HTML rules. This results in a document object model where each node represents a branch on the tree.

    General Rules To Follow


    HTML5 has loosened up the rules somewhat but it is still desirable to follow these rules for well formed HTML documents.

    Close Every Tag
    Most Tags contain content, meaning that there is an open tag and a closing tag to signify where the content starts and where it ends. Some tags do not need to close, like <img>because there is no content. These tags are pointer to content, and get replaced by that content. Other tags are self closing, like the <meta /> and <br /> tags. List of self-closing tags: area, base, br, col, embed, hr, img, input, keygen, link, meta, param, source, track, and wbr.

    Accidentally not closing a tag can cause all kinds of havoc and will be flagged when validating. It is a common occurrence in the first few weeks of writing code.

    Correctly Nest Every Tag
    If a tag opens before a preceding one closes, it must be closed before that preceding one closes. <header><h1>Title</h1></header> not <header><h1>Title</header></h1> CSS relies on proper nesting to target styles to elements, so you have to get this right. In this example, the </h1> tag is nested in the </header> tag, and is the child of the header, which is the parent tag. As a container, a tag acts like a group, and moving a parent also moves all of the enclosed children. Likewise, absolute positioning is based on the coordinates of the parent element.

    If you visualize each element as a node on a tree, it is obvious that you cannot open a tag before the previous tag is closed. If you make a mistake, the browsers can sometimes repair the damage, and everything still displays correctly but don’t count on it, and different browsers have different levels of damage control.

    Inline Tags Cannot Contain Block Level Tags.
    Block-level elements follow one another according to the document flow, one below the other. Inline elements follow one another as characters in a paragraph. While it would seem obvious to not mix these two up, the validator will catch you if you do.
    Keep Tags Lower Case
    This is a requirement of XHTML5, which we will not concern ourselves with but its a good idea anyway.


    Tags Used to “Mark Up” the Content


    Learning HTML comes through writing HTML. The more you code, the easier it becomes till it’s second nature. The content is divided into inline and block tags.

    • Block elements display like paragraphs, coming one after the other vertically down the page in the document flow.
    • Inline elements display just like characters, coming one after the other horizontally till the end of the line. The line then breaks and resumes at the beginning the next line down, and so on.
    • CSS allows you to override the object’s default display and make inline elements display like block elements or vice versa. You’ll learn about that later.

    There are many HTML elements. Mozilla organizes them according to function. That’s helpful. Don’t memorize them. You will remember the ones you use most often and you can always look up the other ones up. Here are all the elements you’ll most likely use:

    Inline Elements


    These elements display just like characters, coming one after the other horizontally, till it comes to the end of the line.

    span

    The span tag selects inline content.

    So much information.

    So much <span style="color: red;">information</span>.

    strong

    increases importance

    So much information.

    So much <strong>information</strong>

    emphasis

    for emphasis

    So much information.

    So much <em>information</em>

    line break

    Breaks the line without creating a new paragraph.

    So much
    information.

    So much <br />information.

    Inline Quotations

    Quotations inside of a paragraph can get automatic quotes when you use this tag and the following CSS pseudo elements. (q:before {content: ““”; } q:after {content: “””; }).

    So much information.

    So much <q>information</q>.


    Anchor Tag (Links)

    The anchor element anchors a URL (uniform resource locator, or a unique web address) that targets the destination id or web page by using the href (hypertext reference) attribute.

    Any tag can be a target, within any document on the world wide web. To target a tag, it has to contain an id <h3 id="anchor">.

    To target the id, you need to use the id identifier, the hash tag # and the id name itself. <a href="#anchor">.

    Hyperlink to destination on the same page

    Click the example below and you’ll see the page jump just a little.

    Hyperlinks to other pages

    A hyperlink can address any unique webpage on the world wide web. It can use an absolute address, or a relative address, if the page is on the same server.

    Absolute Hyperlink Address

    An absolute address starts with http://, as in the address of the page that you are on (look up at the address bar)<a href="http://b.parsons.edu/~dejongo/01-writing-html5/">Writing HTML5</a>.

    Relative Hyperlink Address

    If the page is on the same server, it is possible to omit the absolute reference, and specify the path to the document from the location of the document containing the link.

    Links to a location on the same page are always relative to the page itself.

    Targeting tags on other pages

    Links to a location an another page come at the end of a absolute or relative address.

    and

    Image Tag

    The image tag gets replaced by the image. The img tag does not have a closing tag.

    If the image is not at the location specified by the src attribute you will see a generic missing image icon.

    There has to be an alt attribute so that text will appear if the image does not show up. The img tag will be flagged by the validator if it does not have an alt tag. The information is used by screen readers to explain what the image is about to blind people who listen to web pages. It is also a good idea for illustrators, designers, photographers and other people relying on images to load up the description of each image so search engines can include that in people’s searches.

    The title attribute is optional. The title shows up when you hover over the image for a second or more.
    description of image for screen readers or when images are turned off

    <img src="image_location/name_of_image" alt=“required description of 
    image for screen readers or when images are turned off" title="Final Thumbnail" >

    Comments

    Comments are a way to add notes or hide code. Comments are not displayed by the browser. Use them to notate your document with a description of what’s going on in each part of the document.

    Comments will help remind you why you did something a certain way (or help someone else figure out how to read your code).

    You can also use comments to temporarily hide code that you do not want to use but do not yet want to delete.

    Do not use two dashes in a row — within the comment, as that causes confusion in some browsers.

    <!--
    Comment your Work! 
    -->


    Block-level Elements


    Block elements display like paragraphs, coming one after the other vertically down the page in the document flow.

    div

    div stands for division. It is the generic block element, used when an element is needed for styling purposes, or as a convenience for scripting. The <div> element represents nothing, has no semantic meaning. Do not use in place of elements that have semantic meaning. It is not equivalent to the HTML5 section element.

    content
    <div style="background: pink; padding: 10px;">content</div>

    Headlines

    How a headline looks depends on how they are styled. You should use headlines to structure your content, not based on how they look.

    Headline h1

    Headline h2

    Headline h3

    Headline h4

    Headline h5
    Headline h6
    <h1>Headline h1</h1>
    <h2>Headline h2</h2>
    <h3>Headline h3</h3>
    <h4>Headline h4</h4>
    <h5>Headline h5</h5>
    <h6>Headline h6</h6>
    

    paragraph

    paragraph bla bla bla bla.

    paragraph bla bla bla bla.

    <p>paragraph  bla bla bla bla.</p>
    <p>paragraph  bla bla bla bla.</p>
    

    Block Quote

    Used to style quote that takes up an entire paragraph. It is indented and given a different style.

    paragraph bla bla bla bla.

    So much information.

    <p>paragraph  bla bla bla bla.</p>
    <blockquote>So much information.</blockquote>
    

    Thematic Break (Horizontal Rule)

    Although previous versions of HTML defined the hr element only in presentational terms, as in horizontal rule, the element has now been given the specific semantic purpose of representing a “paragraph-level thematic break” which is to be styled using CSS. For legacy reasons, browsers still render the <hr> as a horizontal rule.


    <hr>
    

    CSS:

    hr {
    	display: block;
    	margin-before: 0.5em;
    	margin-after: 0.5em;
    	margin-start: auto;
    	margin-end: auto;
    	border-style: inset;
    	border-width: 1px; 
    }

    ordered list

    Ordered lists are numbered sequentially.

    Ordered List

    1. list item
    2. list item
    3. list item
    4. list item
    5. list item
    <h3>Ordered List</h3>
    <ol> 
    <li> list item </li> 
    <li> list item </li>
    <li> list item </li>
    <li> list item </li>
    <li> list item </li>
    </ol> 
    

    Continuation of the Ordered List

    If you plan on breaking the list into several lists but want them to be numbered sequentially, use the start attribute start="5". This would start the list at 5 instead of 1.

    1. list item
    2. list item
    3. list item
    4. list item
    5. list item
    <ol start="6"> 
    <li> list item </li> 
    <li> list item </li>
    <li> list item </li>
    <li> list item </li>
    <li> list item </li>
    </ol>

    Unordered List

    Unordered lists is for a collection of unordered items, where the order would not change the meaning of the list. It is always used for navigation, with each menu item considered as part of the list. The unordered list is styled to remove the list style.

    • list item
    • list item
    • list item
    • list item
    • list item
    <ul> 
    <li> list item </li>
    <li> list item </li>
    <li> list item </li>
    <li> list item </li>
    <li> list item </li>
    </ul>

    Definition Lists

    Definition lists is for a list of terms and corresponding definitions. The term to be defined is listed first with the definition coming after the term. A term can have multiple definitions, and a definition can have multiple terms. A definition header can precede the definition.

    List Header

    Term 1
    This is the definition of the first term.
    Term 2
    This is the definition of the second term.
    <dl>
    <lh>List Header</LH>
    <dt>Term 1</dt>
    <dd>This is the definition of the first term.</dd>
    <dt>Term 2</dt>
    <dd>This is the definition of the second term.</dd>
    </dl>
    
    term
    definition1
    definition2
     
    <dl>
      <dt>term</dt>
      <dd>definition1</dd>
      <dd>definition2</dd>
    </dl>
    
    term1
    term2
    definition
     
    <dl>
      <dt>term1</dt>
      <dt>term2</dt>
      <dd>definition</dd>
    </dl>
    

    Interactive Elements: details

    The details disclosure element does exactly what you think it does. It toggles information that is initially hidden, disclosing it. It takes two tags, the <disclose> tag and the <summary> tag. The summary tag has a triangle in front of it that when clicked discloses the hidden information.

    Details

    Something small enough to escape casual notice.

    <details>
        <summary>Details</summary>
        Something small enough to escape casual notice.
    </details>
    

    table

    The HTML table layout mode allows authors to arrange data — text, images, links, forms, form fields, other tables, etc. — into rows and columns of cells.

    Simple Table

    table cell item table cell item
    table cell item table cell item
    <table> 
    <tr> 	<td> table cell item </td>
    <td> table cell item </td> 
    </tr> 
    <tr> 	<td> table cell item </td>
    <td> table cell item </td> 
    </tr> 
    </table>

    Fully Loaded table

    A table can have a head, multiple table bodies and a table footer. You can span both rows and columns with the rowspan="2" or colspan="2" attribute. This allows for the header to expand down and the footer to expand across in the following example.

    The Caption Holds the Title of the Table
    Head 1 Head 2a Head 3
    Head 2b
    table cell item table cell item table cell item
    table cell item table cell item table cell item
    table cell item table cell item table cell item
    table cell item table cell item table cell item
    The footer is a place for information about the table.
    <table id="table">
    <caption>The Caption Holds the Title of the Table</caption>
    <col><col><col>
    <thead> 
    <tr><th rowspan="2">Head 1</th><th>Head 2a</th><th rowspan="2">Head 3</th></tr>
    <tr><th>Head 2b</th></tr>
    </thead>
    <tbody>
    <tr> <td> table cell item </td>  <td> table cell item </td>  <td> table cell item </td></tr>
    <tr> <td> table cell item </td> <td> table cell item </td> <td> table cell item </td></tr>
    </tbody>
    <tbody>
    <tr> <td> table cell item </td>  <td> table cell item </td>  <td> table cell item </td></tr>
    <tr> <td> table cell item </td> <td> table cell item </td> <td> table cell item </td></tr>
    </tbody>
    <tfoot>
    <tr><td colspan="3">The footer is a place for information about the table.</td></tr>
    </tfoot>
    </table>


    Iframe


    An inline frame places another HTML document in a frame. The inline frame can be the “target” frame for links defined by other elements, and it can be selected by the user agent as the focus for printing, viewing its source, and so on.

    The iframe is exhibited with attributes that are determined using the equivalent CSS in the demo width: 98%; height: 300px; border: 1px solid #f000; overflow: scroll;.

    <iframe src="01-html-css-primer/">height=300 width=200 frameborder=1 scrolling=yes >You need a Frames Capable browser to view this content.</iframe>

    Writing HTML, Absolute and Relative Addresses, Tools of the Trade

    Target iframe from Link

    You can target any page to appear in the iframe by naming it and using the target attribute with the name target="iframeDemo" as demonstrated above. Click on the links above to load different documents.

    A destination anchor is used to position the Writing HTML document at the iframe section. That requires an anchor with the same name <a id="i-frame">. See the link tag above.

    <a href="01-writing-html5/#i-frame" target="iframeDemo" >Writing HTML</a>
    <a href="01-absolute-and-relative-addresses/" target="iframeDemo" >Absolute and Relative Addresses</a>
    <a href="01-tools-of-the-trade/" target="iframeDemo" >Tools of the Trade</a>


    HTML5 tags


    Before HTML5, the generic markup elements, <div> and <span>, were used to mark up the page. That means the code itself had no way of determining what the content was.

    HTML5 changed that.

    HTML5 standardized a lot of best practices to create semantically relevant block level tags that help organize the document. It is now possible to tell header content from the content of an article by looking at the tags alone. The most important of the new elements are: <main>,<section>, <header>, <nav>, <article>, <aside>, <footer>, <figure>, <figcaption>, <hgroup>, <wbr>.

    Document Layout

    <main>
    <section>
    
    	<header>
    
    		<hgroup>
    			<h1>Name</h1>
    			<h2>Name</h2>
    		</hgroup>
    
    	</header>
    
    	<article>
    		<p>content <wbr> content</p>
    

    the <wbr> tag, or Word Break Opportunity tag, is an inline tag that specifies where in a text it would be ok to add a line-break.

    		<aside>
    			<p>content</p>
    		</aside>
    
    	</article>
    
    	<footer>
    	</footer>
    
    </section>
    </main>
    

    Adding Navigational Links

    Using an unordered list.

    <nav>
    	<ul>
    		<li><a href="#">link to homework</a></li>
    		<li><a href="#">link to homework</a></li>
    		<li><a href="#">link to homework</a></li>
    	</ul>
    </nav>
    

    Adding a Picture

    With a caption.

    <figure>
    	<img src="example.jpg" alt="example" >
    	<figcaption> Caption </figcaption>
    </figure>
    

    Copy and paste this basic HTML5 template into a blank Textwrangler file. It has most of these elements and a basic header, so you can start coding the content right away. Repetition will acclimate you to writing HTML.